The Wacom Intuos Pro M 2017 (PTH-660) is the tablet that almost everyone refers to as the “professional” grade screen-less tablet. One, because it’s Wacom, and two, because it’s got a ridiculously high price.
Clearly, it must be head-and-shoulders above the competition when it costs nearly triple the price of competing products.
I bought this tablet from my nearby electronics store because it was a refurbished item on sale for around 40% off. There was no chance that I was going to buy this tablet at full price when I could buy 3-4 other tablets to review for the same price, so I figured this was my best chance to finally get hands-on experience with Wacom’s current high-end offering.
With this, I should finally be able to confirm how legitimate people’s claims are about Wacom being “the best” in the business.
My expectations for this tablet were, surprisingly, not very high. I already knew about most of its flaws from the internet because it has been out for 2 years already, and I already have experience with the previous Intuos Pro M (PTH-651). Honestly, I didn’t expect it to be groundbreakingly different from the previous generation.
Were my expectations wrong? Not really. It’s almost exactly how I expected it to be. Obviously, it’s quite good because of how much it costs, but quite frankly, I still feel that the price is well above what it’s really worth, especially in comparison to the other tablets I’ve tried.
Anyways, let’s just get onto the review!
Please note!
-I am not a Mac or Linux user!! I mainly only tested this tablet on Windows 10 version 1803.
-Prices may have changed since I wrote this review.
-Check when a review was written. Some aspects may improve or change over time, so it is in your best interest to concentrate on reviews which are less than 1 year old.
-It is a good practice to check multiple reviews to cross reference their information before you make a conclusion about a tablet.
Table of Contents
How good is this tablet?
Design choices: Very good!
-Nitpicks: Power button placement
Hardware quality: Pretty solid.
-Nitpicks: Button quality, touch ring sensitivity, pen build quality, pen nib wear, bad Bluetooth connectivity
Tablet drivers: Fully featured!
-Nitpicks: Custom pressure curve limits, touch ring settings reversed
Drawing test results: Mostly good!
-Nitpicks: Not smooth pen pressure for shorter strokes, hard to draw thin lines
Actual drawing experience: Really good!
-Nitpicks: Flat pen nib
Overall: Quite good! But… only if you ignore the price.
My verdict:
I would probably only recommend this to Wacom enthusiasts, or to people who are afraid to shop online.
After actually getting to test this tablet myself, I can state with confidence that this tablet is absolutely not worth its price, especially in today’s tablet market.
It draws quite well, as it obviously should for 350 USD, but it basically offers nothing that you don’t get from other cheaper options. To make things even worse, you have to buy separate accessories like the 100 USD Wacom Art Pen to make it unique from cheaper options, increasing the already ludicrous price even more.
Specifications at a glance
Price: 349.95 USD (when this review as written)
Active Area: 8.7 x 5.8 inches
Pen Type: Battery-free
Pen Buttons: 2 side buttons, eraser on end
Pen Pressure: 8192, both pen tip and eraser
Pen Tilt Sensitivity: Yes, +-60 levels
Shortcut Keys: 8 buttons, 1 Touch ring
Multi-touch: Yes
Other features: Bluetooth wireless
What’s in the box?

My tablet came in this box which I assume is missing the outer cover. It’s missing the outer cover because it’s a refurbished device.
The Wacom Intuos Pro that I got is a Wacom refurbished device, meaning that Wacom themselves cleared it as “like new” sell-able status before returning it to the store I bought it from. Therefore, it should perform just like a brand new Intuos Pro and the fact that it is refurbished should have almost no effect on this review.
With that said though, if it turns out my device was worse than a “normal” Intuos Pro, we might need to talk about Wacom’s standards for refurbishing.

The things that come in the box:
- Wacom Intuos Pro (PTH-660) tablet
- Wacom Pro Pen 2 battery-free pen
- Pen stand
- Tablet cable (USB type-A to USB type-C)
- Pen nib replacements x10 (plastic nib x6, felt nib x4)
- User manual
- Coloured pen rings
- Rough/Standard/Smooth texture sample pads
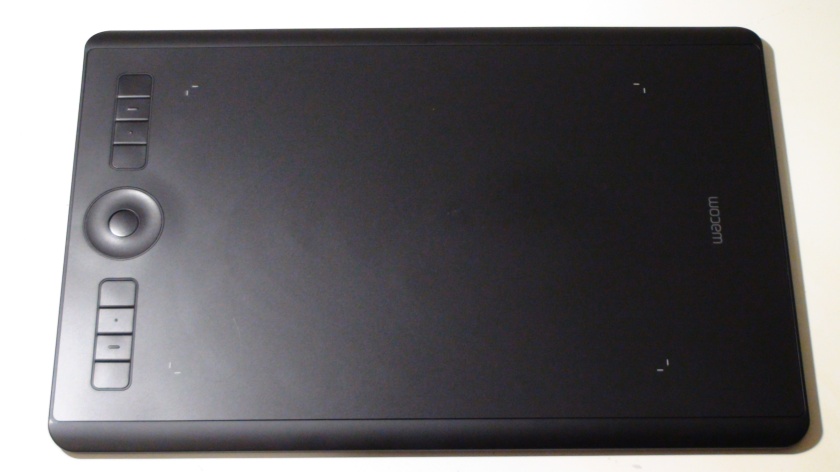
This tablet has the base design which most other drawing tablets currently follow. The textured drawing area in the center, and shortcut buttons off to one side for easy access. You could even say that the Intuos4, the first version of the current Intuos Pro line, was the very tablet which defined how a screen-less tablet should look.
I like this design and it is very functional as well as aesthetically pleasing.
There is almost no flex when doing a simple twist test by gripping both ends of the tablet and twisting, and the tablet feels extremely solid and is actually fairly heavy. This is most likely due to the back being made of some kind of metal alloy, and the battery for the wireless.

The surface of the tablet has a very rough finish which is meant to imitate a paper-like feeling. Wacom was the company which came closest to a paper-like experience, however, the newest texture they use feels slightly rubber-y compared to their previous textures due to the new plastic+rubber material they use. I also noted this same feeling on the new Intuos 2018.
This new texture is quite nice when using a brand new nib, but once the nib starts flattening and having more surface area rubbing against the surface, it starts gripping the texture more and more, increasing the rubber-y feeling the flatter your nib gets.
It’s not a bad texture even when it feels rubber-y, but I personally prefer the less grippy plastic textures they used to use.
With that said, an advantage of this new plastic+rubber texture is that it doesn’t wear out as quickly as plastic textures. Unlike plastic textures which show wear immediately, this new texture shows no wear yet (despite completely annihilating my pen nib).
This is a good thing in that it addresses the age old problem of the texture just wearing off right away, but it is a rather bad thing in terms of pen nib life.
This tablet has replaceable texture sheets, meaning you can replace the drawing surface if it’s worn down or damaged. There are also 3 different textures you can get which are Rough, Standard, and Smooth. This tablet comes with the Standard texture.
The Wacom Intuos Pro is probably the only current tablet which has replaceable texture sheets which is a really nice feature in terms of long time usage.

The back of the tablet appears to be made from some sort of metal alloy as it is cold to the touch, and the tablet itself is quite heavy overall. This is one of the few screen-less tablets on the market which uses a metal back, so it was most certainly built to last.
The back also has two long rubber feet spanning the whole tablet for maximum stability, and the usual information sticker.

The front edge of the tablet has a beveled edge, giving it a comfortable place to rest your wrist while drawing.
I appreciate that Wacom is keeping this design on their tablets because a lot of screen-less tablets now have non-beveled edges (they’re just cornered edges), and I find those quite uncomfortable to work on for long periods of time.

This tablet has 8 shortcut buttons and a touch wheel along the side of the tablet. These buttons are… decent, but they’re far below what I expected from a device of this price range.
The outermost buttons in each clump of 4 feel extremely mushy and require way too much force to press, while the inner buttons in each clump of 4 feel fantastic and have just the right amount of feedback. The feeling of the outer buttons are horrible compared to the inner ones.
This could certainly be because my tablet is a refurbished product, but then that brings up questions about Wacom’s refurbishing standards as this is technically being sold as a “like new” product.
The touch wheel on this tablet was also a rather big disappointment for the price of the tablet. It is very insensitive and I could often move my finger halfway around the wheel before it finally registers a “click” of the function. It certainly works, but it is frustrating using it because you can never properly control how much it activates.
The button in the middle of wheel is only for switching the function of the wheel and nothing else. There are 4 white lights around the wheel which show you the function you are currently on based on which is lit up.
The tablet port for the Intuos Pro is located on the side opposite the shortcut keys so the cable doesn’t end up under your hand when using the shortcut keys. This is a good design which not many other companies currently use for some reason.
The port itself is a standard USB type-C port with no tunnel in front of it. The use of USB type-C is really good here as it allows for the user to plug in the L-shaped cable whichever direction they need to, depending on whether they are right or left-handed.
The tablet cable is a ~200cm cable (quite long!). It does not come with a strap or twist tie.

On the side of the tablet, there are two extra features. One is the power button for the Bluetooth wireless, and the other is the touch on/off switch.
To use the Bluetooth wireless, you should turn on the power using the power button, then press and hold the touch wheel button to start pairing. A blue light on the opposite side of the tablet will start flashing while pairing.
The way the power button is protruding also caused my to accidentally click it all the time. I’m sure accidentally turning it on in your bag won’t cause the batteries to drain that much, but it’s annoyingly easy to click accidentally.
On the topic of Bluetooth wireless, it was very noticeably laggy and all my inputs were clearly delayed.
This was tested on my Laptop which runs Bluetooth 4.0 and has no problems with using the tablet with the USB wired connection. I also made sure to put the tablet as close to the laptop as I could when using Bluetooth, but that made no difference and the inputs were still noticeably delayed.
I believe you should pretend that this tablet doesn’t come with wireless because it’s almost unusable with the delay.
The touch on/off switch is the only way for you to enable/disable the finger-touch feature on this tablet, which is a great idea because now the touch on/off function doesn’t have to be assigned to one of your shortcut keys. However, I disabled the touch because I use my tablet with a glove on and my palm often registered random touches.
The touch control was quite good, like what you would expect from a laptop touchpad, but it was a nuisance while drawing so I had to leave it disabled. I also just see no use for it because rotating or zooming with my fingers is no quicker than using my keyboard.

The Wacom Intuos Pro uses the Pro Pen 2 battery-free pen. This is the wide barrel rubber grip pen shape that basically all tablet companies use now thanks to Wacom popularizing it. It has a semi-hard/semi-soft rubber grip with two side buttons and a pen eraser on the end.

Holding this pen is very comfortable and I like how it feels to hold.
However, I have to point out that the whole inner mechanism of the pen moves around slightly when I shake the pen. Pressing the pen nib also moves the whole inner mechanism, and holding down the eraser is the only way to keep everything in place.
The fact is, I noticed this exact same issue with the previous generation Wacom Intuos Pro which I used to own. With that one, the inner mechanism gradually started moving around so much that I needed to tape down the eraser to prevent it from affecting my pen pressure control.
The inner mechanism should not and will not budge in a “perfect” Wacom pen, and I know this because my colleagues who have new Pro Pen 1’s have solid pens, but clearly it is fairly easy to break these Pro Pen’s as I’ve already experienced 2 pens with this exact same issue out of the box.
It should be noted that none of the pens from other companies have had this issue with the inner mechanisms moving about, so clearly this is a Wacom specific pen design issue.
This is not a good impression for the quality of the Pro Pen 2, and this is really worrying due to the fact that this is a 90 USD pen. Yes, 90 USD for the pen!
The quality of the tablet itself is very good and I have absolutely no doubts about its durability, but the Wacom Pro Pen 2 seems worryingly easy to break despite its ridiculously high replacement cost. I really wish Wacom would concentrate on increasing the durability of their pen to match the durability of their tablet.
If you have a pen where the whole inner mechanism moves when you shake the pen, you may want to try contacting Wacom for a replacement because it can get worse over time and actually start affecting your pen pressure control.
You can tell whether your pen has this issue or not by comparing how the pen feels to shake with the pen nib held down or not. The eraser tip will rattle in both tests, but the pen will feel noticeably more solid when holding the pen nib down if you have this issue.
This is most likely caused by the fact that the pen tip and eraser tip are both attached to the same PCB which spans the whole pen. Basically, it’s a rod (the pen tip, PCB, and eraser tip) put inside a tube (the pen outer shell).
The “rod” is most likely not properly held in place inside the pen, and this allows for the inner mechanism to move, which in turns affects how the pen tip moves when you use the pen.
I was actually able to fix this by heating the plastic around the middle of the pen with a hair dryer, enough to melt and deform it slightly and make it form a tighter grip on the inner mechanism.
I was actually trying to melt the glue so I could pull the pen apart, but I accidentally fixed the issue instead by making the plastic melt into a tighter shape around the inner mechanism.
The two side buttons protrude noticeably from the surface of the pen, making them easy to locate without having to look down at your pen to find them. The also feel good to use them and click nicely.
The common complaint about protruding buttons is that you accidentally click them sometimes, but I would much rather have protruding buttons I can actually find without looking at, rather than buttons that I can’t find at all (therefore making them useless) because they are flush with the surface of the pen.

The top of the pen has the pen eraser.
I personally think that a pen eraser is useless as flipping the pen is slower than using a shortcut, and the eraser tip will eventually wear out thanks to the rough surface, making it unusable without buying a replacement pen.
Of course, if you find it necessary for your art, then Wacom is the only one who offers a good pen eraser at the moment. Hopefully, you don’t mind the price of it.

The pen nib wear is absolutely ridiculous on this tablet. The above is my pen nib after using the tablet for roughly one whole day. As you can see, it is completely flattened, and I often felt it rolling around when I was drawing my strokes.
I actually did adjust the pen pressure curve as much as I could to still have decent thin lines and less force for the highest pressure, but Wacom’s drivers don’t let you lower the max pen pressure very much, so the pen nib wear still happened even with those adjustments.
The flat pen nib luckily does not affect your drawing, but like I said before, the flatter it gets, the more it grips the new texture, causing you to feel more like you’re drawing on rubber rather than paper.
The rate at which the pen nibs wear is very worrying. These nibs are thinner and smaller than previous generation nibs, so if you draw intensively for just 3 days, it seems like you will need to replace your nib (depending on whether you press hard or not, of course).
This means that your 7 included plastic nibs will last only 3 weeks! (Or something like ~2 months assuming you don’t draw intensively every single day).
(I did not use the felt nibs because I really disliked how much they gripped the rough surface.)
The pen stand is a solid piece of metal with a plastic cap. It’s really weighty so it won’t move at all, especially with its rubber feet.
You can put the pen standing upright, or sideways on the stand.
Opening it up reveals the pen nib compartment, and the bottom of the stand is the pen nib remover with instructions printed on it. This tablet comes with 6 plastic replacement nibs, and 4 felt replacement nibs.
To close the stand, line up the dot on the metal part and the plastic part, then twist opposite the “open” arrow.

These are the coloured rings they include which you can put on the end of your pen to “personalize” the look of your pen.

Inside the box comes a texture sample pad which allows you to test how the textures feel in case you want to buy a new one. I really like how the smooth feels compared to the standard. It’s actually a lot smoother than the standard sheet and it seems like it would’ve been a much better texture for most people as it would clearly not wear out pen nibs as fast as the standard texture.
Honestly, it’s such a scam that you have to buy these sheets separately for 30 USD each after already paying 350 USD for the Intuos Pro. At least give us the option to choose which texture we want the tablet to come with when buying the tablet online, rather than making us pay an extra 30 USD on an already expensive tablet.
This obviously isn’t possible for in-store purchases, but they really should at least offer that option online.
Tablet drivers
The tablet drivers are very simple to install. Just go download the latest version from Wacom’s site and uninstall all other tablet drivers you have on your computer before installing it.
The Wacom drivers are very extensive, so this section is kind of long.
If you installed the driver successfully, it should ask you to restart your computer. Once you’ve restarted your computer and plug in your tablet for the first time, it should bring up a “first-time setup” window which will guide you through the main features of the Intuos Pro, then open the Wacom Desktop Center.
You can access the Wacom driver options by right-clicking the Wacom Intuos Pro battery icon in the system tray, but to access the Wacom Desktop Center again, you will have to manually search for it through the start menu (by clicking Windows key).
In the Pen tab in the Pro Pen 2 section, you can select the tip feel, double click distance, tilt sensitivity, and assign functions to the two side buttons and pen nib.
There are a lot of functions to choose from, so take your time to look through all of them.
The reason why the Pro Pen 2 appears as an individual tool in the upper section is because you can set different functions for different pens if you have any of the special pens Wacom sells.
The customize button under the tip feel allows you to manually adjust the pen pressure curve. I adjusted the curve to have a lower max pressure so I wouldn’t need to press as hard.
Unfortunately, the manual pen pressure curve option is limited in that it doesn’t let you reduce the max pen pressure very far, so it doesn’t really let you reduce the pen nib wear that much. I was really surprised that the curve wouldn’t let me move the max pressure lower than ~70%. What’s the point of this limitation?

The Eraser tab in the Pro Pen 2 section controls the settings of the pen eraser. You can change the function that the eraser activates, or just customize the pressure curve for the eraser.

The Mapping tab in the Pro Pen 2 section controls the orientation of the tablet, as well as which screen it’s mapped to.
Select which monitor you are using the tablet with in the Screen Area section, and remember to select the “Force Proportions” option so that the area ratio of your tablet matches your monitors aspect ratio.
Most programs work better with Windows Ink disabled, so you should uncheck the Use Windows Ink checkbox unless you are using a program like Photoshop which requires it to be turned on.

The Expresskeys tab in the Functions section controls the functions which are assigned to the shortcut keys. Just like the pen buttons, there are a lot of functions to choose from, and I doubt anything is missing.
The “Show Express View” checkbox changes whether the Express View feature shows up on screen when holding your fingers on the buttons.
An issue here is that the Express View doesn’t properly show up on the monitor your pen is assigned to. It only shows up on the “main” monitor which your computer has assigned. If you’re not using your “main” monitor as your drawing screen, then the Express View will show up on the wrong screen.

The Touch Ring tab in the Functions section controls the functions which are assigned to the touch ring. You can assign 4 different functions and the center button will toggle through them.
If you want to disable function slots for the touch wheel, select the SKIP function instead of the Disabled function. That way, the wheel won’t toggle to the Disabled slots.
An odd issue here is that the function you assign to counter-clockwise will activate when you spin clockwise, and vice versa. I really wonder how Wacom never noticed this.

I honestly have no idea what this tab is for…
I think you can just ignore it honestly.

The On-Screen Controls tab in the Functions section controls the menus which you can have floating around on your screen. These are very helpful if you want to only use the shortcut keys and no keyboard.
You should look up how to use them if you find that the 8 shortcut keys and touch wheel are not enough for all your functions. The Radial Menu is especially useful.
The Touch Options tab in the Touch section controls the finger touch options such as pointer speed, scrolling speed, and double-tap time.
The Standard Gestures tab in the Touch section controls what gestures are enabled. If you have touch off, these options will be greyed out.
The My Gestures tab in the Touch section controls some gestures which are left available for you to customize.

The Wacom Desktop Center is your go to for everything related to your Wacom tablet. To open it, press the Windows key and search Wacom. It should be one of the search results.
In the My Devices section, you have the options to edit your tablet settings, find tutorials, and help for the tablet, and other info about your tablet.
In the Backup Settings section, you have the option to save all your Wacom settings either on your computer, or on the Wacom cloud. If you made a lot of changes to the defaults settings, you will most likely want to backup your settings
In the Updates section, the Wacom Desktop Center will automatically check for driver updates, or firmware updates for your tablet(s). Automatic update checking is a feature that no tablet company aside from Wacom has, and it is very nice that you do not need to manually check the Wacom site for driver updates.
However! Never update your driver if your tablet is already working with the current driver! Wacom is notorious for releasing driver updates which break tablet functionality, so you are much better off sticking with the driver version you have until it stops working. If you ever update and your tablet stops working, go look up how to roll-back to a previous version.
Aside from those main sections, the Marketplace button opens a website for buying drawing applications, the Store button opens the Wacom store website, and the Support button opens the Wacom Customer Support page.
Overall, the Wacom drivers are the most customizable and user-friendly drivers I have seen. Everything is quite high quality as expected from their higher price point (although there are, of course, some small issues here and there as I highlighted).
Drawing tests
These pen tests are all done with the same settings for both the canvas and the pens. These tests are only done in Clip Studio Paint as that is the only program where I totally understand how to remove all unwanted variables.
If you are worried about whether this tablet will work with your art program, don’t be afraid to contact support to ask them directly.
-The canvas will always be a 3000x3000px 300dpi page (the above test page is a 3000x6000px 300dpi page, so just two pages stuck together).
-The test pens are mostly all 100px linear pressure curve pens. Pen pressure for size and/or opacity is enabled based on the test.
-The slow ruler line test uses a 10px no pen pressure pen to clearly show wobble and jitter. I also use a 50px pen pressure enabled pen to see the visibility of wobble/jitter with pen pressure is enabled.
-The IAF (Initial Activation Force) test uses a 300px linear pressure pen to show the thinnest lines possible, as well as demonstrate the IAF of the tablet.

1) Scribble Test – Grade: Pass-ish
Test pen 1 – 100px – pen pressure: size
Test pen 2 – 100px – pen pressure: size+opacity
For my pen tests, I always start out with a few pen pressure scribbles to see if I can do some nice squiggly lines with increasing pen pressure. I also do some back and forth shading and some spirals with increasing pen pressure.
With the Wacom Intuos Pro, I have some troubles consistently getting the thinnest lines at the start of my scribbles. It was really hard getting my strokes to start with very thin lines and I often just ended up with a pretty thick blotch at the start instead.
I could see that it could do thin lines sometimes though, so I can give the tablet a pass-ish grade here.

2) Slow Ruler Line Test – Grade: Pass
Test pen 1 – 10px – pen pressure: none
Test pen 2 – 50px – pen pressure: size
The slow ruler line tests done with a no pen pressure pen were absolutely perfect on this tablet. Even when the pen was tilted all the way over, there was no noticeable wobble appearing in the line.
This tablet completely lives up to the Wacom name when it comes to how perfectly straight these slow ruler lines came out.
This tablet gets a pass here for sure.

3) Quick Hatching Test – Grade: Pass
Test pen 1 – 100px – pen pressure: size
The quick hatching test is to check whether the tablet keeps up with pen inputs. Usually, the only way to fail this section is if the pen is noticeably laggy and causes unwanted inputs like fishhooks at the beginning or end of the line.
As you can see, this tablet appears to have no problems with fishhooks. I also never noticed the cursor lagging noticeably, so it gets a pass here.

4) Short Release Taper Test – Grade: Pass
Test pen 1 – 100px – pen pressure: size
This test is meant to see the smoothness of the pen pressure taper when going from max to min pressure quickly. Basically, you press your pen down hard then flick to the side to see how smoothly the stroke tapers.
With the Wacom Intuos Pro, the tapers look very nice and appear to have no problems with jaggedness. The pen pressure didn’t register when I only pressed the pen nib in a single spot, but that has no relation to this test, so it gets a pass here.

5) Pen Pressure Control/Transition Test – Grade: Pass-ish
Test pen 1 – 100px – pen pressure: size+opacity
This section is to test the smoothness of the transitions in pen pressure.
-The circles at the top are one of Youtuber Brad Colbow’s tests. It is used to check if you can properly control the pen pressure all the way around a circle. If there is a pressure jump, some circles will feel impossible to control due to that jump.
-The lines at the bottom are slow strokes done with smooth increases or decreases to pen pressure in mind. The arrow points in the direction which the stroke was done, and the smoothness of the gradients show how smooth the pen pressure transitions.
In terms of the pen pressure control circles, I only had problems with the very light circles where I couldn’t properly control the thinnest lines.
In the pen pressure transition testing, there is a weird effect which happens for the shorter strokes, but the pen pressure transitions are quite good if you do longer strokes.
If you look closely, the pen pressure transition happens in noticeable steps when doing shorter strokes.
(Please refer to the full testing page at the top of this section. You cannot zoom into the preview on the right because of how WordPress scales it.)
I believe this is caused by what I mentioned earlier in the Short Release Taper Test about the pen pressure not registering if I just press the pen nib in one spot. Because the Wacom pen is powered by movement through the electromagnetic field, the less it moves, the less power it has, causing it to update the pen pressure less often for shorter strokes. (That’s just my guess though.)
It’s a weird issue though considering I haven’t seen it on other battery-free tablets doing the same tests. I’m not sure why only Wacom has this issue.
I can give this tablet a pass-ish grade here as it seems to have no problems in all the other sections of the test, although again, it was very hard to consistently get very thin lines with this tablet.
6) Initial Activation Force & Lightest Pen Pressure Test – Grade: Pass
Test pen 1 – 300px – pen pressure: size
This test tries to demonstrate the IAF of the tablet, and also shows the lowest possible pen pressure the tablet is capable of producing consistently.
IAF is the amount of force necessary to cause the pen to output a line. Ideally, your tablet will have an extremely low IAF where the pen will output a line with the least amount of force possible.
A high IAF causes issues such as light pen taps not registering as clicks, and the inability to sketch very lightly, both of which become quite annoying the more you experience it.
For this test page, the squiggly lines should begin right on the start line.
-If the line begins right on the start line, this indicates that the IAF is extremely low (low IAF is best) and the line just appears naturally without effort.
-On the other hand, if the line does not begin on the start line and instead begins further along the stroke, this means that the IAF is high so I needed to search for the IAF by increasing my force little by little until I finally started outputting a line.
An example of the ideal test page is the Huion New 1060 Plus (2048) IAF test page which I included above for comparison. Almost all the lines begin right on the start line meaning it has extremely low IAF, and the lines are almost transparent showing that the tablet is capable of drawing extremely light pen pressures.
The Wacom Intuos Pro has an acceptably low IAF and I was able to get the lines to start decently close to the start line. The IAF was low enough that I never noticed it getting in my way when tapping options or sketching.
In terms of the lightest pen pressure, I could often get pretty thin lines during the test, but it was very hard to keep it consistent as it would often suddenly become thicker or completely disappear.
With that said, the Wacom Intuos Pro is good enough in both these regards that I can give it a pass here.

7) Pen Tilt Test – Pass
Test pen 1 – 100px – pen tilt: opacity
Test pen 2 – 100px – flat pen – pen tilt: direction
This test shows the smoothness of the pen tilt by gradually tilting the pen while slowly moving the pen to the side. This section also includes scribbles using the pen direction determined by pen tilt.
As you can see in the smoothness test, the pen tilt on the Wacom Intuos Pro is quite smooth. You can technically see the steps in the gradient, but it is very smooth for pen tilt which only has 60 levels from upright to tilted.
The tablet receives a pass here for sure.
Overall
So all in all, the drawing test results are:
1) Scribble Test – Pass-ish
2) Slow Ruler Line Test – Pass
3) Quick Hatching Test – Pass
4) Short Release Taper Test – Pass
5) Pen Pressure Control/Transition Test – Pass-ish
6) Initial Activation Force & Lightest Pen Pressure Test – Pass
Non-Vital Drawing Tests:
7) Pen Tilt Test – Pass
Ideally, all the above tests should have at least a “Pass-ish” for their grades because the most vital function of a drawing tablet is to draw properly and predictably. Failing any of these tests means that it doesn’t do that.
The drawing experience!
My actual drawing experience with the Wacom Intuos Pro was quite good and it was decently enjoyable. The pen pressure worked mostly as expected, and the feeling of using the tablet was quite nice.
The biggest factor which made me not really love the experience was the flat pen nib. Occasionally, it would roll over the flat spot and remind me about how I would have to buy pen nibs in a week or so if I wanted to avoid getting reminded of the pen nib every time. I could certainly replace it every day, but then I would just have to buy replacements even more frequently.
I didn’t particularly hate the texture despite how it felt a bit rubber-y, but the pen nib becoming flat and rolling around was a nuisance.
In terms of the pen pressure, I found it odd that I couldn’t draw light pen pressures very easily, despite this being a 90 USD pen on a 350 USD tablet.
This level of drawing performance, I’ve seen in a lot of other much cheaper tablets. This fact just made it feel even worse than it is, just because of how ridiculous the price is for this level of performance.
Conclusion
This tablet is a complete step up compared to the low-end Wacom Intuos, but it’s truly nothing magical or special when compared to the tablets I have tested from other companies.
It’s almost undeniable that Wacom is deliberately making their low-end products crap so that anyone who upgrades from an Intuos to an Intuos Pro will feel like they’ve actually made a great upgrade to a “professional” product, when in fact, they only moved up from trash to a standard product.
The biggest problem with the Wacom Intuos Pro is that it’s simply an average tablet with big pen nib wear problems, and you have to buy extra things to make it unique or usable, despite it already having a ludicrous price of 350 USD which is 3-4 times any of its competitors.
-For instance, you have to buy the 100 USD Wacom Art Pen to get the pen rotation functionality which no other company has, otherwise this tablet is not unique in any way aside from its metal alloy back cover.
-Then you also have to buy a 30 USD smooth texture sheet separately to control how quick your pen nibs wear. If you don’t buy the smooth texture sheet, you have to buy pen nibs 10 for 10 USD every few months.
If you look at the paper specs, this tablet certainly looks like it has unique features such as Bluetooth wireless, multi-touch, pen eraser, and touch wheel. However, as I pointed out:
1) The Bluetooth wireless is noticeably laggy and delayed, so it is unusable when compared to the wired mode.
2) The multi-touch doesn’t add anything useful to the drawing experience, and the palm rejection is fairly bad.
3) The pen eraser is not very useful in the first place, and wearing it out will just result in you having to buy a new expensive pen.
4) The touch wheel is not very sensitive and ends up being a chore to use because of this.
Now, if these features were actually good, then this would be a different story and we could attempt to explain the 350 USD price with “high quality” features. However, with how subpar those features actually are, we really can’t use them to explain the high price of this tablet at all.
Quite frankly, this tablet is most certainly not worth 350 USD for what it offers in today’s tablet market.
Like I said before, I would probably only recommend this to Wacom enthusiasts, or to people who are simply afraid to shop online (because Wacom is basically the only brand being sold in-store).
Places to buy the tablet
Amazon.com | Amazon.ca | Wacom Store
People living in other regions should check their regions online retailers.
If you have any questions about the tablet, feel free to ask me!


 - IAF Test")
