
Note: Just a heads up!
I used the new WordPress Block editor for half of this review before getting annoyed with it and switching to the old editor. Because of this, there may be some broken parts in the review which I have not noticed.
All the images broke… So I went and fixed them, but the new editor doesn’t have some image minimizing options that I used previously, so the Drawing Tests section has some large images.


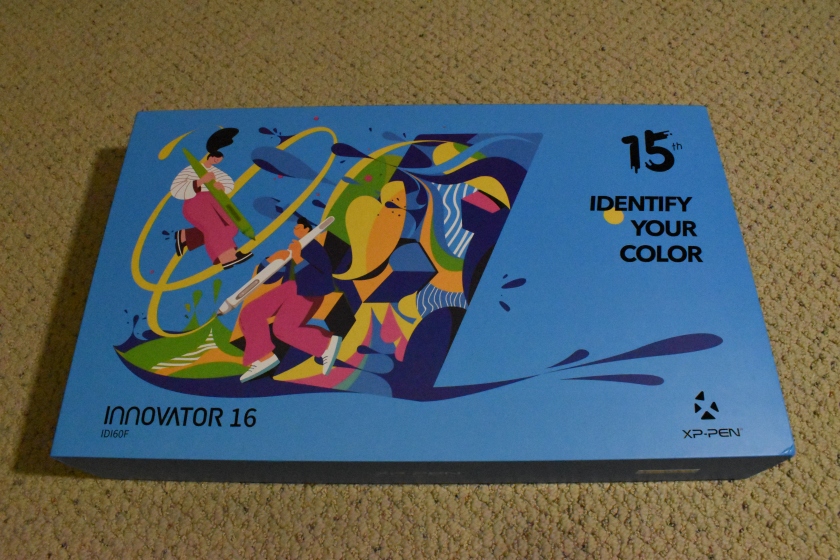
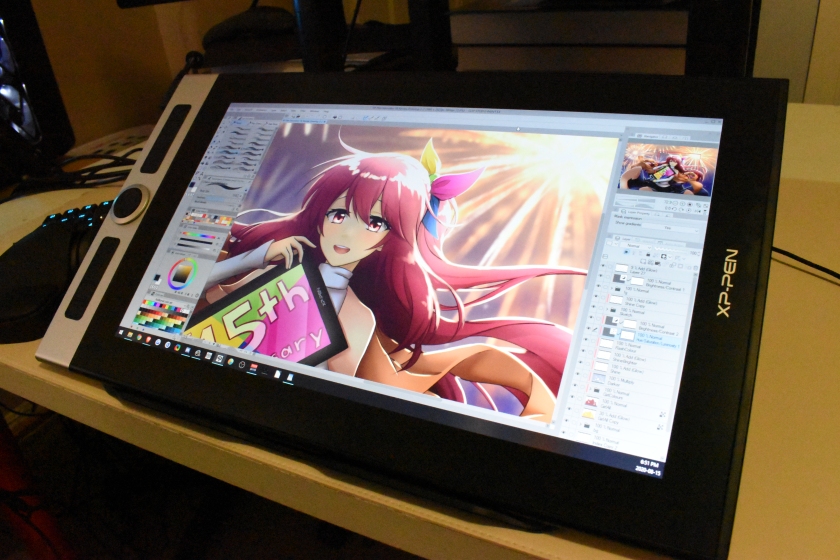
The XP-Pen Innovator 16 is the first product to be released in XP-Pen’s new Innovator series of tablets. Its selling point is its thinness of only 9mm which should technically make the tablet very portable and easy to carry around. It’s also made to look like a professional tool with its silver accent design.
Another feature which makes this tablet unique is the dual wheel that has both a physical wheel and touch wheel built-in. This is XP-Pen’s special take on wheel-type shortcut keys and I am quite a fan of it.
Going into this review, I had relatively high expectations for this tablet. XP-Pen has almost always offered mid/high quality drawing monitors, so I was hoping that they had somehow improved largely since I last reviewed their tablets around a year ago.
I can’t say that they’ve made particularly large steps forward (which is expected when their products are fairly high quality already), but the Innovator 16 is still very competitive nonetheless and actually has a few aspects where it shines above others. I can suggest sticking around for this review if you’re interested in the Innovator 16.
For this review, XP-Pen was kind enough to send me the XP-Pen Innovator 16 for review. As usual, this review is based on my honest thoughts and opinions about the tablet and I will never agree to review a product if I am required to say only good things about it.
If you believe receiving a product for free makes a review biased, now is a perfect time for you to stop reading.
As a side note, XP-Pen is currently celebrating their 15th anniversary and is holding a massive sale on all the tablets on their official web store. I suggest checking those sales out!
Anyways, onto the review!
Please note!
-I am not a Mac or Linux user!! I mainly only tested this tablet on Windows 10 version 1909.
-Prices may have changed since I wrote this review.
-Check when a review was written. Some aspects may improve or change over time, so it is in your best interest to concentrate on reviews which are less than 1 year old.
-It is good practice to check multiple reviews to cross reference their information before you make a conclusion about a tablet.
Table of Contents
- How good is this tablet?
- Specifications at a glance
- What’s in the box?
- Screen quality
- Tablet drivers
- Drawing tests
- The drawing experience!
- Conclusion
- Places to buy the tablet
How good is this tablet?
Design choices: Mostly good!
-Nitpicks: Power button placement
Hardware quality: Very sturdy!
-Nitpicks: Coil whine if you don’t plug in the USB for power
Screen quality: Quite vibrant! Factory calibrated is a big plus!
-Nitpicks:
Tablet drivers: Fairly complete! Some restrictions.
-Nitpicks: Cannot assign keyboard+mouse shortcuts
Drawing test results: Quite satisfactory!
-Nitpicks: IAF is noticeable, extremely thin lines are hard to make consistently
Actual drawing experience: Fairly enjoyable!
-Nitpicks:
Overall: An overall noteworthy tablet!
My verdict:
-If you are considering this tablet, I think it’s a good choice among the numerous 15.6-inch drawing monitors currently available on the market.
The biggest advantage this tablet has over its competitors is the fact that it actually comes factory calibrated to the sRGB and 6500K standard, so you won’t need to worry about getting colour calibration equipment in addition to the tablet!
Factory calibration is surprisingly overlooked in the drawing monitor space despite colour accuracy being fairly important for art.
Like I mentioned in the introduction, XP-Pen is currently holding a massive 15th anniversary sale on their webstore. If you want to buy the XP-Pen Innovator 16, I suggest considering it during the sale where it’s being sold for only 400 USD.
Here are some links to the anniversary edition Innovator 16 which is on sale for the same price as the normal Innovator 16:
NA: https://bit.ly/3h3cqnh
UK: https://bit.ly/3aygR6M
AU:https://bit.ly/3g7mvy2
EU: https://bit.ly/310d7Id
SEA: https://bit.ly/2CwSv0L
Specifications at a glance
Price: 499.99 USD (when this review was written)
Active Area: 13.5 x 7.6 inches, 15.6 inch diagonal
Resolution: FHD 1920 x 1080 (16:9 ratio)
Display Type: IPS, gamut = 125% sRGB/92% AdobeRGB/88% NTSC on product page
Pen Type: Battery-free
Pen Buttons: 2 side buttons, no eraser
Pen Pressure: 8192
Pen Tilt Sensitivity: Yes, levels unspecified
Shortcut Keys: 8 buttons, dual wheel
Multi-touch: No
Other features: Low-angle tablet stand included, fully-laminated display.
What’s in the box?
The tablet comes in a standard box with a nice design.
P.S. I received the Anniversary Edition Innovator 16 for this review.
The difference is that it has an anniversary box and some anniversary goodies.
The tablet itself is not different, so this review still applies to the non-anniversary edition Innovator 16.


The things that come in the box:
- XP-Pen Innovator 16 tablet
- Low-angle tablet stand
- XP-Pen PA5 battery-free pen
- Pen case
- Combined cable (USB type-C to USB type-A, HDMI, USB type-A for power)
- USB type-A power adapter
- USB type-A extension cable for power
- Pen nib replacements x8
- Anti-fouling glove
- Screen cleaning cloth
- User manual
The anniversary edition extras:
- Fenix keychain
- Fenix postcards
- Fenix stickers
- XP-Pen ink pen
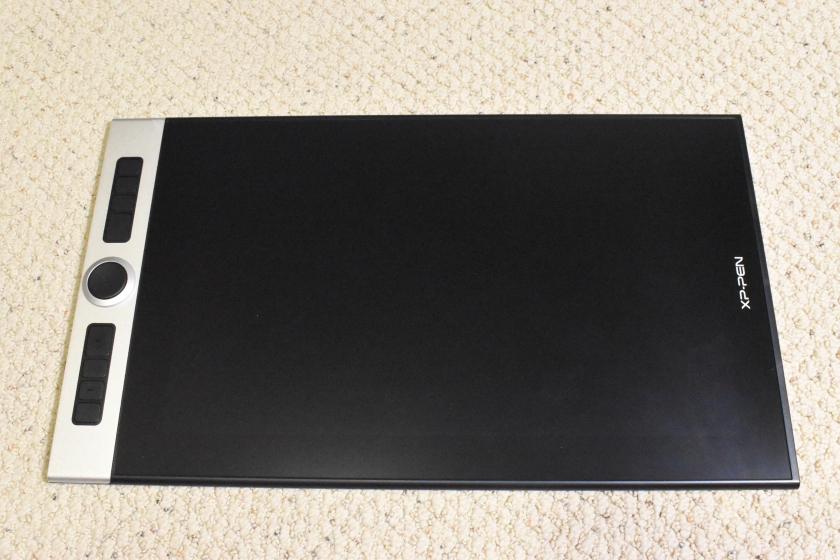
The XP-Pen Innovator 16 is a very slim and sleek looking device with silver accents that deviates from the norm of all-black drawing monitors.
As is the case with most 15.6-inch tablets, due to the extra length created by the expresskeys area, don’t expect this tablet to fit into 15.6-inch laptop bags. It should fit in 17-inch or bigger laptop bags though.
It feels sturdy when performing a simple twist test, where I grab both sides of the tablet and try twisting the tablet a bit with just my hands.
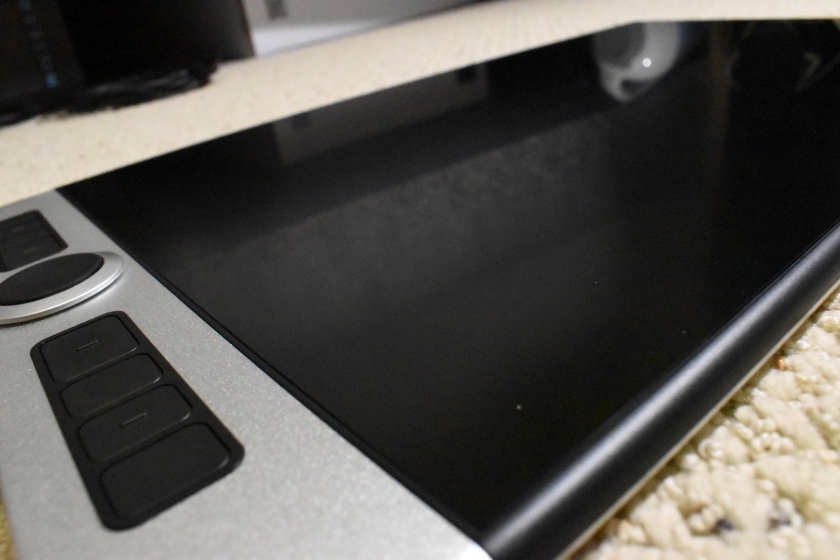
I believe this tablet comes with a textured screen protector pre-applied. I am not completely sure because it was applied so well that I couldn’t get my fingernail under it to peel off a corner to check. However, it does look like a screen protector is applied.
The texture is quite nice and it strikes a nice balance of not too rough and not too smooth (in my opinion).
It should be noted that it felt scratchy at first, but it seemed to “mellow out” and become less scratchy as I continued using it. I suggest wiping it down a few times with a microfiber cloth and giving it a few hours of usage if you find that it feels scratchy at first.
As far as I can see, there is no scratches or wearing on the surface after my week of intensive use.
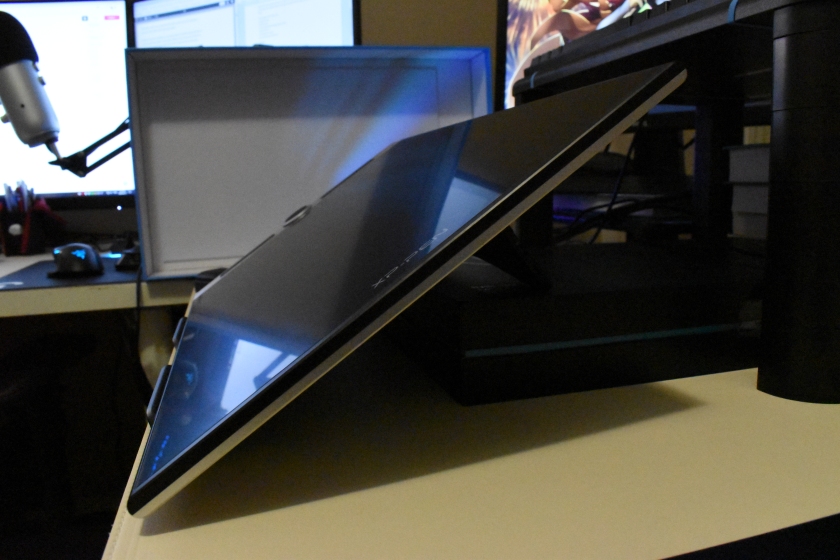
The XP-Pen Innovator 16 is advertised to be only 9mm, and yes, it is very thin when viewed from the side.
It’s actually not particularly light despite being this thin, most likely due to its metal alloy back, so don’t expect your bag to be as light as a feather with the tablet in it. However, being this thin gives the advantage of being able to slide into a laptop bag beside the laptop it’ll be used with.
Again, I will mention that it will probably only fit in 17-inch laptop bags or larger.
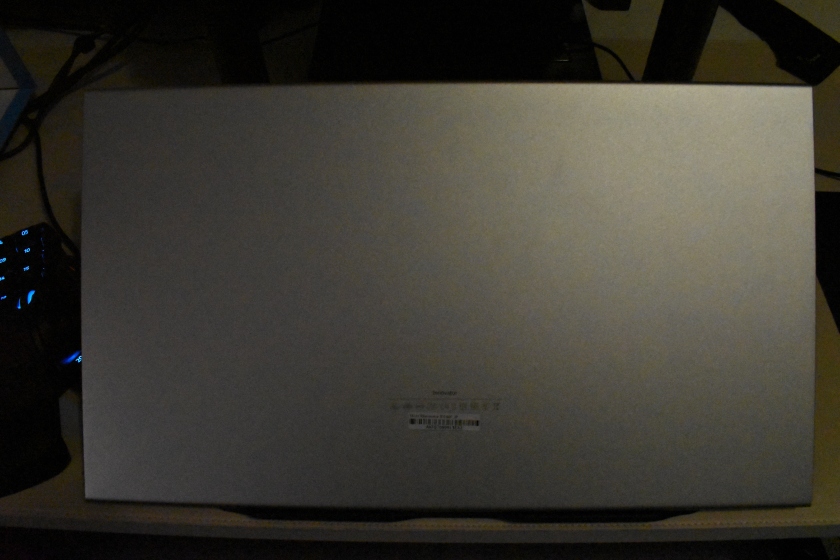
The back of the tablet is made of a silver material that seems to be a metal alloy of some sort.
I will point out here that there are no rubber feet on the back of this tablet. I would advise using it on the included plastic stand which has rubber feet on it.
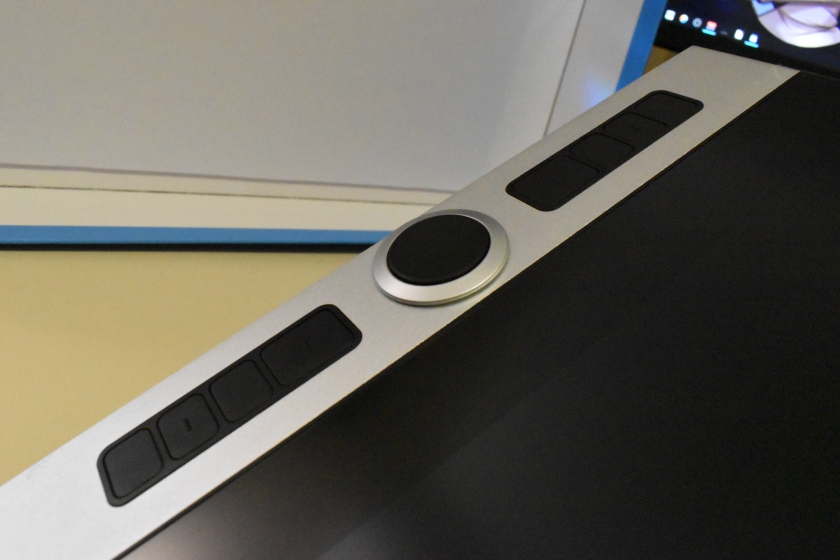
There are 8 programmable buttons and the dual wheel in a line along the side of the tablet. All the buttons are programmable through XP-Pen’s drivers.
These buttons feel great to use and are not too hard to press, and they are also not too loud. Overall, these are very nice shortcut buttons.
XP-Pen also did not forget to put bumps in the middle of every second key to help you feel which button is which. That way, you do not have to look away from your work to figure out which button your finger is on.
The dual wheel is XP-Pen’s unique take on wheel type shortcut keys. The outer ring is a physical wheel which spins very smoothly, while the center black area is a touch wheel which will sense your finger sliding in one direction or the other. Basically, there are two wheels available for use in the same package.
I personally prefer this style of dual wheel over the conventional one-function-at-a-time wheel as it allows you to access 2 wheel functions (such as zoom and rotate) seamlessly, whereas conventional wheels require you to press a “switch function” key to switch between the wheel functions, making it less convenient to use.
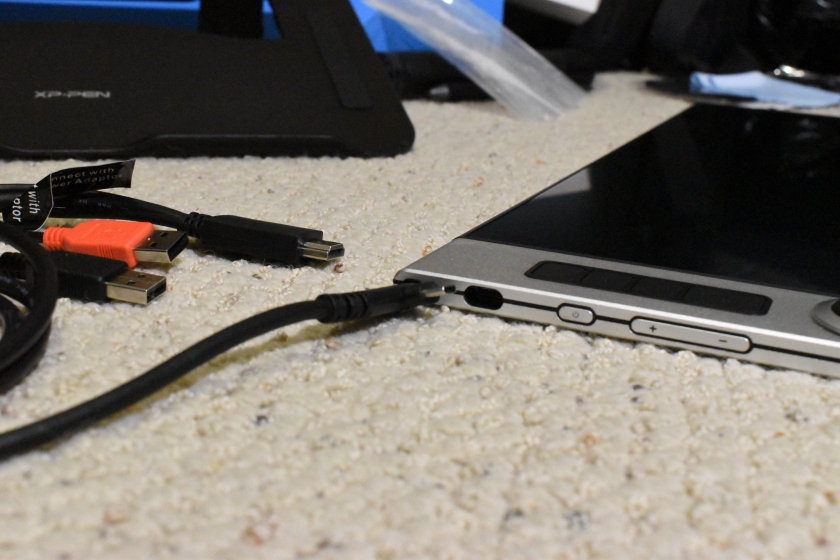
The XP-Pen Innovator 16 comes with a 3-in-1 cable that connects the tablet using a single cable that goes from USB type-C on the tablet, to USB type-A for data, HDMI for display, and USB type-A for power.
If you do not plug in the USB type-A for power and only plug in the HDMI and USB type-A for data, the screen will be powered but there will be a high pitch coil whine from the tablet around where the cable plugs into it.
This seems like it would be bad for the device, so I highly suggest plugging in the USB type-A for power into the power adapter, or into another USB port on your computer.
The USB type-C port on the tablet has a hole in front of the port. I know many people hate this design because it means you can only use a proprietary cable, however, in the case of drawing tablets, it has the advantage of supporting the cable and keeping the cable anchored to prevent the port from breaking from accidental pulls and cable weight.
This is my opinion, but I would rather replace a proprietary cable than risk having the port break from cables that are not held in place well.
If the cable breaks outside of warranty, you just have to buy a new cable. If the port breaks outside of warranty, you have to buy a whole new device.
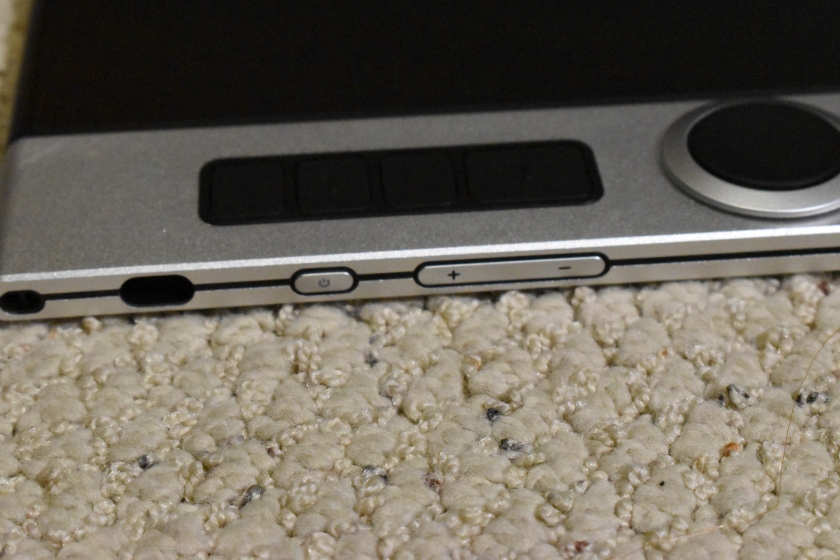
On the side of the tablet beside the shortcut keys are the power button and OSD keys.
The OSD keys only adjust the brightness and the actual colour adjustments are available in the XP-Pen drivers.
One nitpick I have here is that the power key will be somewhat blocked by the cable if it’s plugged in the opposite way. You can still press the power button even when it’s like that, but it’s a slight design oversight nonetheless.
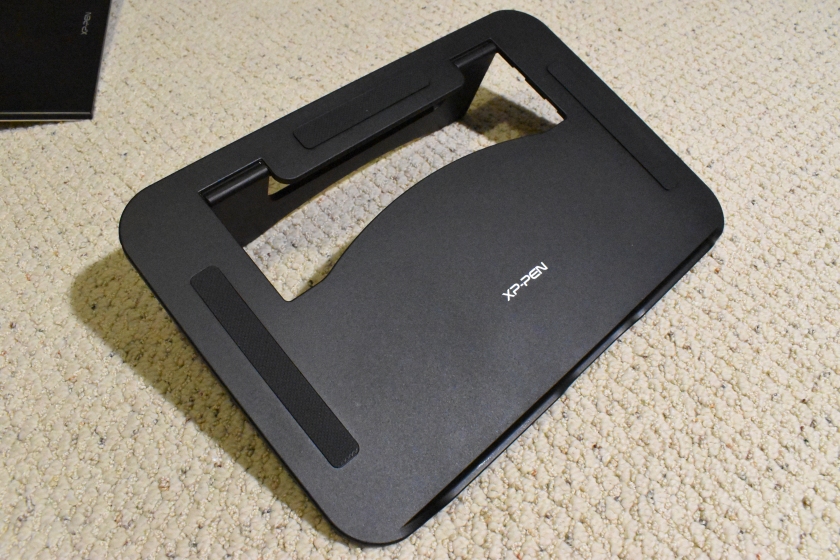
The included tablet stand is a plastic contraption with rubber feet that only supports one angle.
Personally, I find this angle quite low and uncomfortable to work on for long periods of time, so I propped it up with a box to give it a higher angle. It was quite stable even with this setup.


The XP-Pen Innovator 16 uses the PA5 pen which has a wide rubber grip design with a dull-silver accented top. It was quite comfortable to use and I have no complaints about it.
Oddly enough, this pen doesn’t have a bulge towards the bottom of the grip like most other pens do. However, the rubber was grippy enough that I didn’t have problems holding the pen without my fingers sliding down when applying heavy pressures.
The 2 pen buttons protrude slightly from the surface of the pen, making them easy to find and use by feel alone. They also have a nice tactile click and are easy to use.
The top of the pen does not have anything.


The tablet comes with a pen case for protecting and carrying around your pen if needed. The lid functions as a pen stand, while the other end holds all the replacement pen nibs and pen nib remover (the middle silver hole).
A funny thing to note here is that the pen stand doesn’t seem to hold the pen straight upright, but it does still do its job of keeping the pen standing so no issue there.
Screen quality
The XP-Pen Innovator 16 displays colours very nicely out of the box. I was very surprised to find that the colours were very accurate out of the box when I measured them.
With that said, I ran into an issue where my display colours looked very muted the first time I plugged the display in. This is because Windows had automatically assigned a random colour profile to the display which was completely wrong.
To check for this, right-click on your desktop and select “Display settings”. Then identify and select the Innovator 16 at the top and look at the Color Profile section.
If the drop-down is blank, there is no problem. However, if there is a profile in there, Google how to remove a color profile from your monitor.
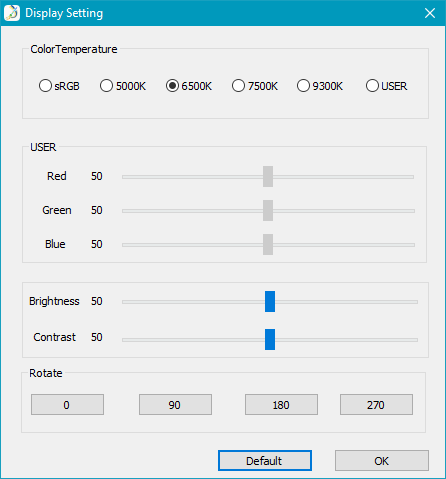
To access the colour settings, you will need to install the XP-Pen drivers, then click the ‘Display Setting’ button in the bottom right. In the screen that pops up, you will be able to adjust the colours, brightness, and contrast. You can also rotate the display from this window.
The XP-Pen Innovator 16 comes set to 6500K by default and is very accurate to that standard. I don’t recommend changing the display colours from default unless you have a colorimeter, although you can tweak the brightness to suit yourself.
Note: I have been repeatedly saying that sRGB is the colour standard most people should use, but I have actually always been calibrating to the 6500K colour temperature up to this point (whitepoint 6500K, white level 120cd/m2, gamma 2.2).
sRGB is similar to 6500K, but is slightly different. Quite frankly, I do not know which is better, but I personally prefer 6500K.
The IPS display on this tablet does a good job of allowing you to view the same colours from basically all angles. The textured screen protector does dim the colours a bit when viewing from the sides, but when viewing the screen from any “normal” drawing angle, there are no problems with the colours.
XP-Pen advertises this tablet as a 125% sRGB monitor, and from my measurements, it appears to be a truthful claim.
The above results are from my calibration using my X-Rite ColorMunki Display with DisplayCAL, and I measured that the tablet has a 123% sRGB gamut volume. A 2% difference is negligible in this measurement. (The gamut volume being what the tablet is capable of, and the gamut coverage is what my color profile uses.)
Unfortunately, the 84% AdobeRGB volume seems to fall short of XP-Pen’s 92% AdobeRGB claims, but this is still an impressive result nonetheless.
These results are great because this means that the tablet is suitable for use with colour accurate work.
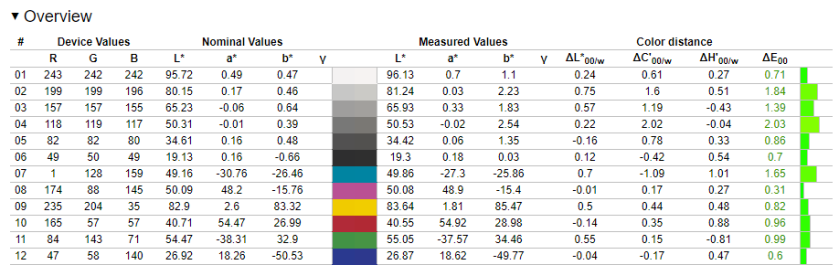
The above are my results from using the Spyder colour accuracy checker available on DisplayCAL.
I performed the above colour accuracy check with my XP-Pen Innovator 16 at default settings. As you can see, the results are all have Delta-E’s close to 0 (closer to 0 is better) and the bars on the right are all in the green which means they’re acceptably accurate.
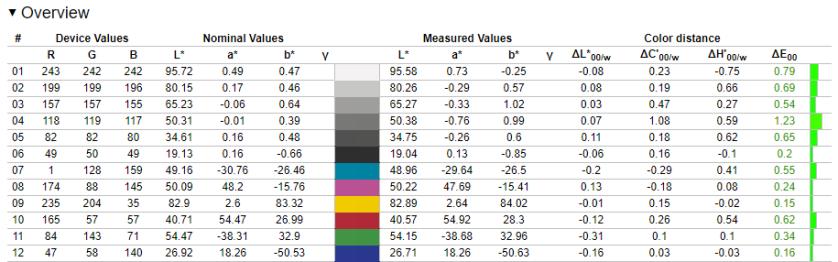
This second colour accuracy chart is the results shown after I calibrated the display.
Compared to the previous chart, the Delta-E’s shown in this chart are better, however, it should be noted that the default settings were already more than acceptable.
I cannot stress how great it is to know that the factory default is calibrated properly. This means that people who cannot afford a colorimeter will have a monitor which has accurate colours out of the box.
Certainly, monitors do degrade over time and will need recalibration eventually, but the default calibration should last someone long enough until they decide they need a colorimeter for their work.
A Blurb About Colorimeters
If you are an aspiring digital creative working with colours, I wholeheartedly recommend investing in a colorimeter. Factory calibration can only last so long before the monitor colours start to drift and become less and less accurate, so it is extremely beneficial in the long run if you invest in a colorimeter. Even Wacom’s factory calibrated tablet monitors are no exception to this and their colours will drift over time because colour drift is an unavoidable aspect of monitors as they age.
Having a colorimeter to calibrate your monitor every month or so is vital if you want to have complete confidence in your colours at all times.
My recommendation for the best cheapest option is the Datacolor Spyder5 Express paired with the free software DisplayCAL. I do not recommend the cheaper X-Rite ColorMunki Smile because it is an old type of colorimeter which loses its reliability very quickly, whereas the Spyder5 Express and pricier models will work for many years to come.
You can read great reviews of these colorimeters at this site:
https://www.color-management-guide.com/spyder5express-review.html
https://www.color-management-guide.com/colormunki-smile-xrite-review.html
And here’s a really simple guide on how to calibrate with DisplayCAL:
https://www.pointsinfocus.com/learning/digital-darkroom/displaycal-and-argyll-cms-quick-start-guide/
Or watch this simple Youtube guide on DisplayCAL by Hardware Unboxed:
https://youtu.be/f2nVNxx1IHo
If you get Spyder colorimeter, here’s how to get the Spyder5 colorimeter to be detected by DisplayCAL:
https://hub.displaycal.net/forums/topic/spyder5-not-detected/
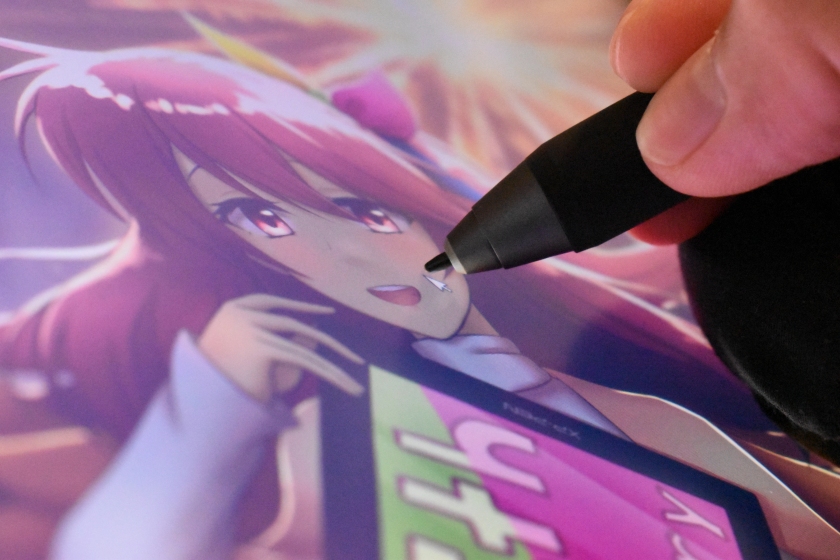
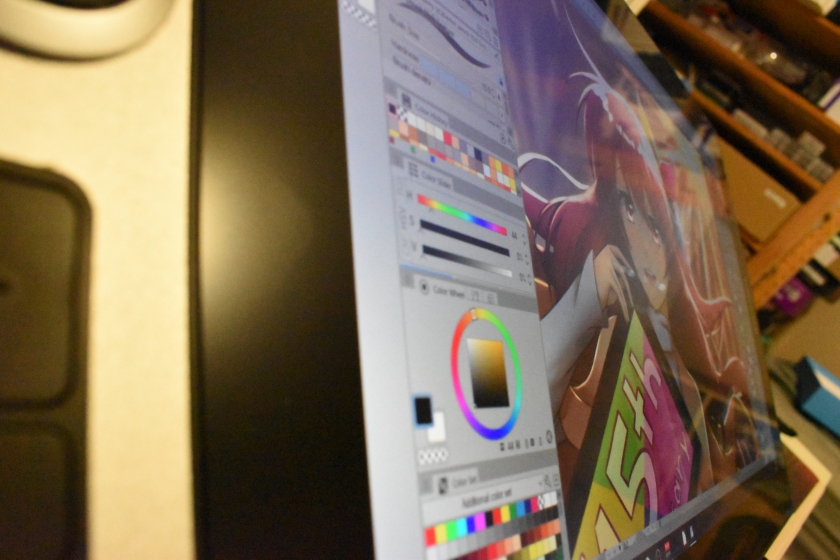
The XP-Pen Innovator 16 uses a fully-laminated display, which is the screen technology that brands use to have reduced parallax (the distance between the pen tip and the screen).
As you can see in the picture above, the pen tip is close to the cursor, however, you can also tell there’s some distance. This is probably in part due to the fact that the Innovator 16 uses a screen protector instead of an etched glass design, which adds to how much material there is between the pen and screen.
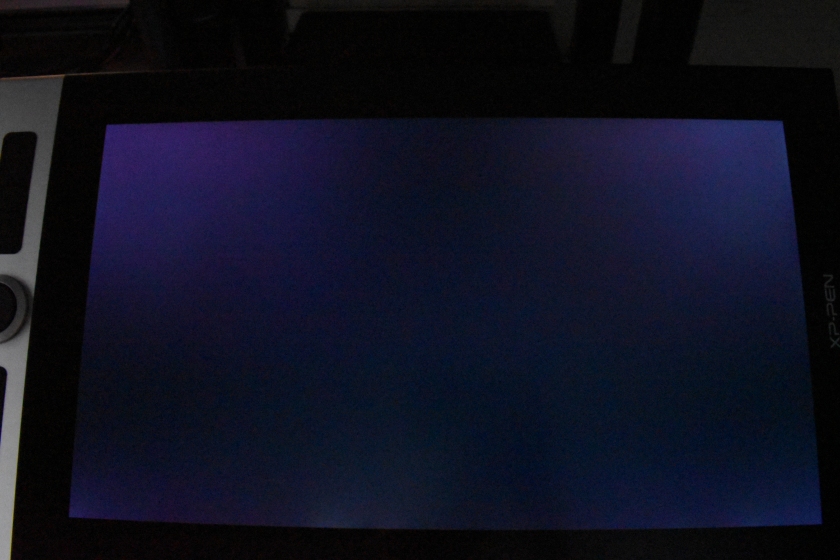
The easiest way to see light bleed is by full-screening a black image. As you can see, there is some light bleed in the corners of my tablet, and some in the middle of the bottom edge. This is a typical amount of light bleed and has no noticeable effect on colours being displayed there.
If your tablet has much more noticeable light bleed (especially if it is noticeable on all colours, not just pure black), you may want to contact XP-Pen support to get it replaced.
Tablet drivers
The XP-Pen tablet driver are extremely easy to install. Just go download the latest version directly from XP-Pen’s site and remove all other tablet drivers you have on your computer before installing it.
Once you’ve installed the driver and plugged in your tablet, the XP-Pen driver icon should appear in the system tray in the bottom right. You can access the tablet settings by clicking on that. The installer will also create a shortcut on your desktop for opening the settings.
If the installer doesn’t prompt you to restart your computer after it finishes, I wholeheartedly suggest restarting your computer anyways to allow Windows to properly update the files necessary for the driver to run smoothly.
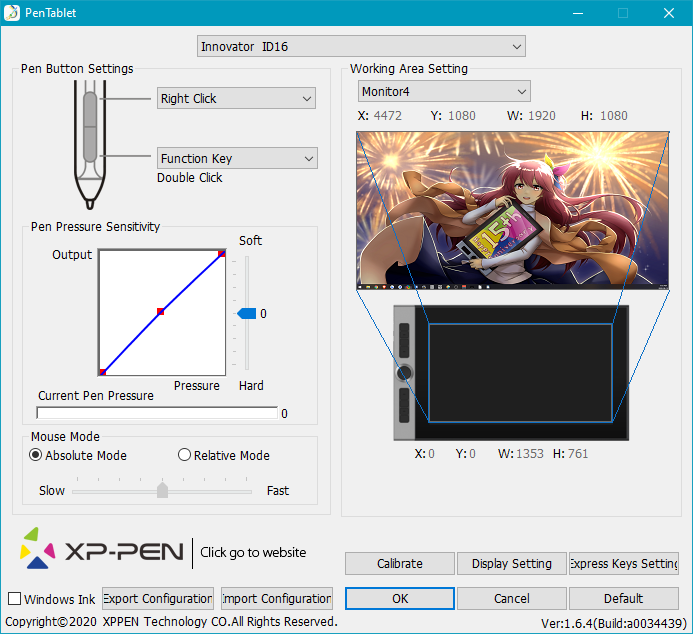
The XP-Pen driver is a simple one page driver with all the important settings in one window. Here you can set the pen buttons and pen pressure, and choose which monitor the tablet maps to.
You may need to check the Windows Ink checkbox if you use programs such as Photoshop which require Windows Ink to be turned on for pen pressure to work. Otherwise, I have found that I prefer having it unchecked.


The Barrel Button Settings section lets you choose the function assigned to the pen buttons.
You can set basically all keyboard or mouse shortcuts that you can think of using the function key option, but you unfortunately cannot combine mouse clicks with keyboard keys in the same function. This is one of the few small cons of the XP-Pen driver which has been around for a fairly long time now.
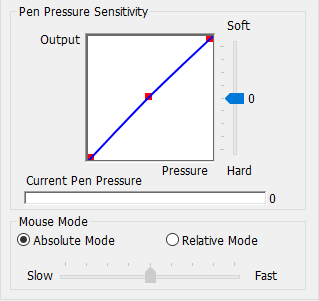
The Click Sensitivity section allows you to manipulate the pen pressure curve directly. For this pen, I didn’t find the need to change anything as the pen pressure was decent at default, but the pen pressure graph is extremely useful for making subtle changes to your overall pen pressure.

The Current Screen section controls which monitor your tablet is mapped to, and what area of your tablet is used.
If you noticed earlier, there was a function called Switch Monitor among the functions you could assign to your shortcut keys. That function cycles through all the available monitors in the drop-down list at the top of the Current Screen section when used, so you can use that to quickly switch which monitor your pen input goes to.


If you click the Express Keys button in the bottom right, a new window will open up with the options for changing the functions assigned to the shortcut keys.
You can click the Dial tabs to change the functions assigned to the physical and touch dial as well.
All the buttons can be assigned mouse clicks, keyboard functions, or the extra functions, just like the pen buttons.
The bar along the top of this window allows you to make program specific profiles which will only be active when the program you assigned is your current active window. It is a useful feature for people who want different functions for different programs.
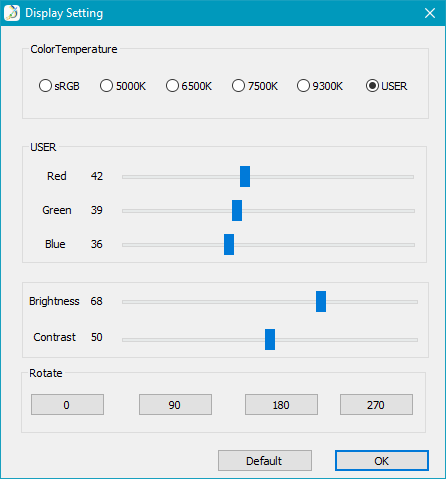
The Display Setting button pulls up the colour settings, and you can also rotate the display for left-handed use here.

The calibrate button brings up the pen calibration which is a 5-point calibration using the 4 corners and the middle. You can click Esc on your keyboard to cancel and exit the calibration.
The default calibration had the cursor a bit higher than the pen tip, so I used to calibration and was able to fix it. I will admit, it took a bit of experimenting on clicking different parts of the red crosses, but I got a decent calibration for myself in the end.
Also, make sure to export all your settings before doing the calibration as there is no way to reset only the pen calibration. You can export your settings with the export configuration button in the bottom left of the main driver screen.
To reset the calibration, you need to click the Default button in the bottom right of the XP-Pen drivers which resets everything, not just the calibration.
I will also mention here that the pen calibration does not perfectly take into account pen tilt/direction yet. It seems to attempt to, but it is not perfect.
Drawing tests


These pen tests are all done with the same settings for both the canvas and the pens. These tests are only done in Clip Studio Paint as that is the only program where I totally understand how to remove all unwanted variables.
If you are worried about whether this tablet will work with your art program, don’t be afraid to contact support to ask them directly.
-The canvas will always be a 3000x3000px 300dpi page (the above test page is a 3000x6000px 300dpi page, so just two pages stuck together).
-The test pens are mostly all 100px linear pressure curve pens. Pen pressure for size and/or opacity is enabled based on the test.
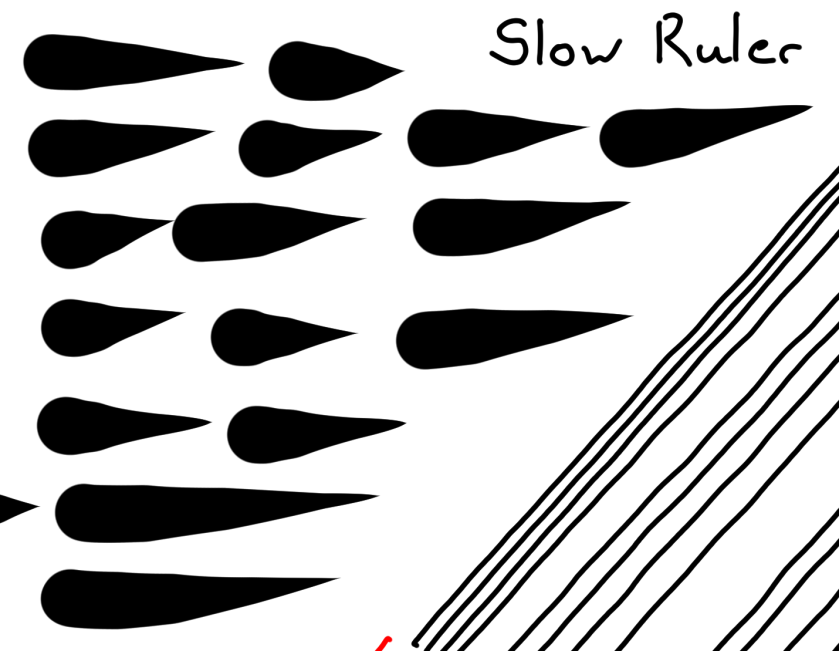
-The slow ruler line test uses a 10px no pen pressure pen to clearly show wobble and jitter. I also use a 50px pen pressure enabled pen to see the visibility of wobble/jitter with pen pressure is enabled.
-The IAF (Initial Activation Force) test uses a 300px linear pressure pen to show the thinnest lines possible, as well as demonstrate the IAF of the tablet.
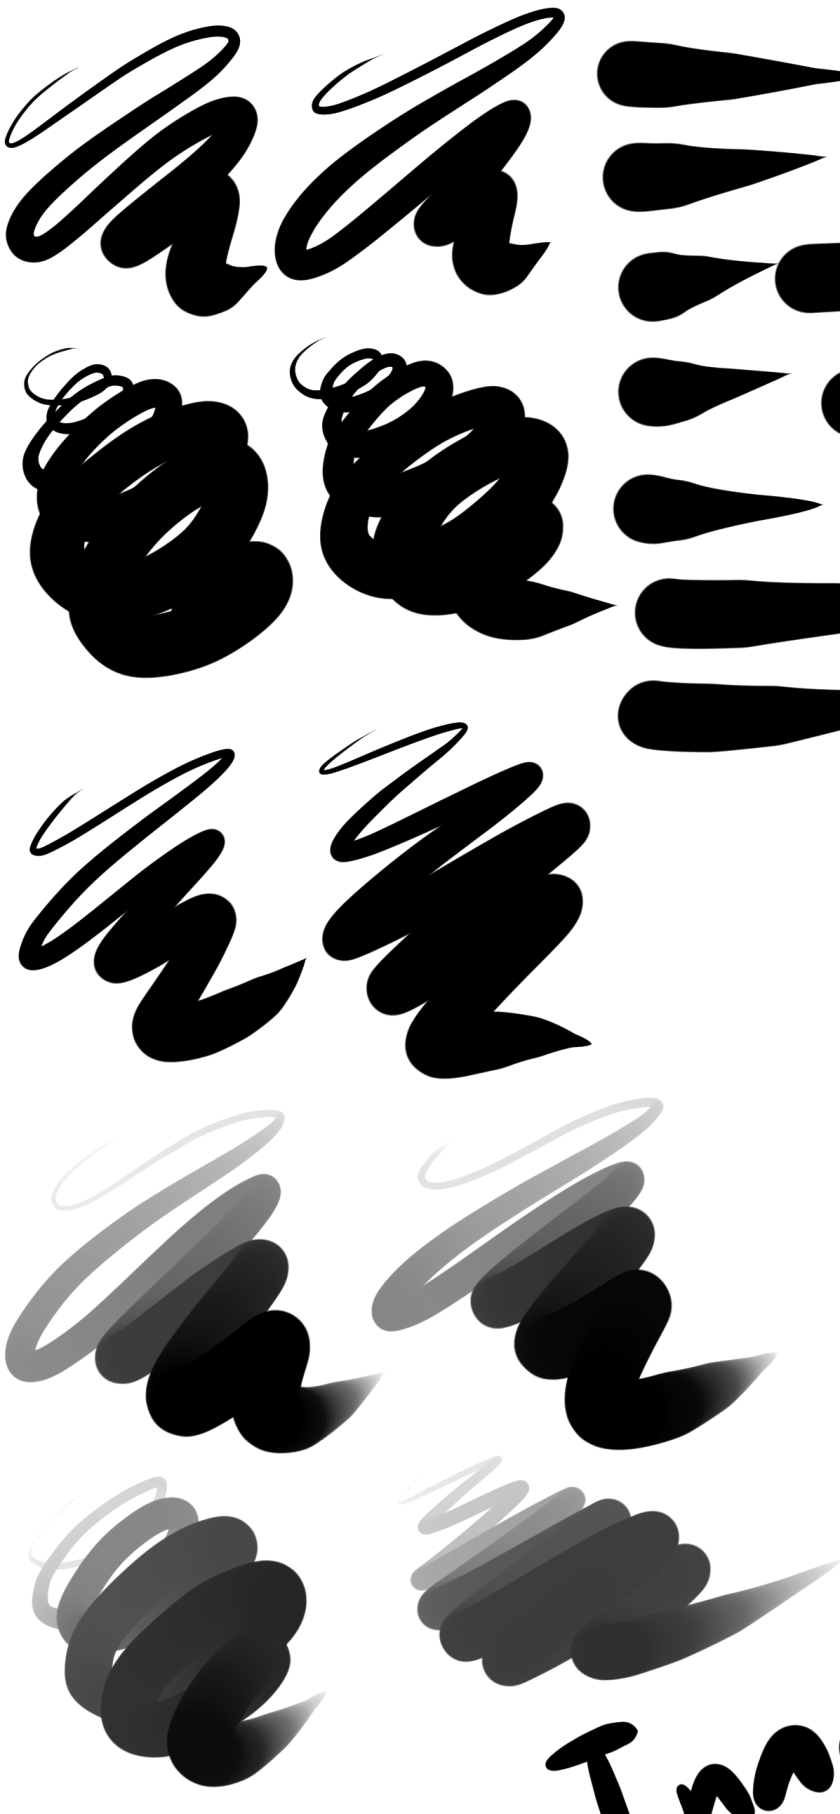
1) Scribble Test – Grade: Pass
Test pen 1 – 100px – pen pressure: size
Test pen 2 – 100px – pen pressure: size+opacity
For my pen tests, I always start out with a few pen pressure scribbles to see if I can do some nice squiggly lines with increasing pen pressure. I also do some back and forth shading and some spirals with increasing pen pressure.
With the XP-Pen Innovator 16, I had no problems doing my little scribbles going from thin to thick. I didn’t have any problems controlling my strokes and making both thin and thick lines was relatively easy. This tablet gets an easy pass here.
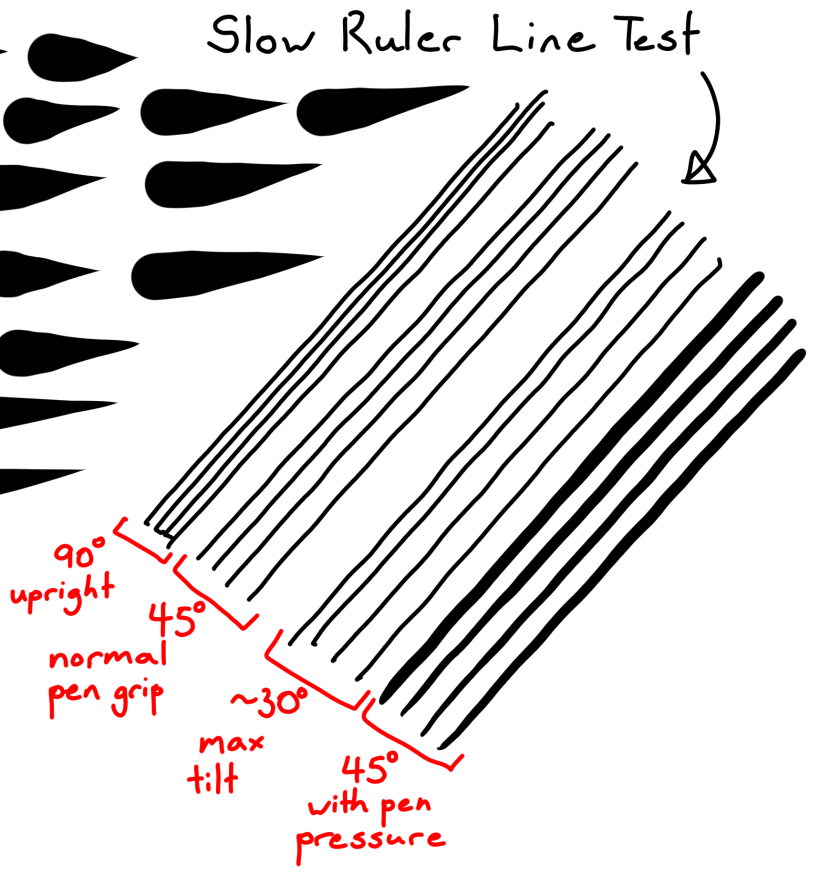
2) Slow Ruler Line Test – Grade: Pass
Test pen 1 – 10px – pen pressure: none
Test pen 2 – 50px – pen pressure: size
The slow ruler line tests done with a no pen pressure pen were quite good at all angles. It can be improved, certainly, but it is more than acceptable.
This tablet gets a pass here.
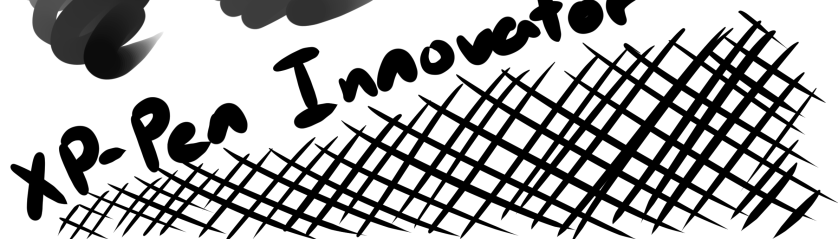
3) Quick Hatching Test – Grade: Pass
Test pen 1 – 100px – pen pressure: size
The quick hatching test is to check whether the tablet keeps up with pen inputs. Usually, the only way to fail this section is if the pen is noticeably laggy and causes unwanted inputs like fishhooks at the beginning or end of the line.
As you can see, this tablet appears to have no problems with fishhooks. I also never noticed the cursor lagging so far behind the pen that it was a problem, so it gets a pass here.
4) Short Release Taper Test – Grade: Pass-ish
Test pen 1 – 100px – pen pressure: size
This test is meant to see the smoothness of the pen pressure taper when going from max to min pressure quickly. Basically, you press your pen down hard then flick to the side to see how smoothly the stroke tapers.
With the XP-Pen Innovator 16, these tapers are not quite as smooth as I would like them to be, but they are an improvement from the pen tapers which I saw from XP-Pen before.
At first, I thought this issue had been fixed because it didn’t occur frequently while I was drawing on the tablet. However, the pen tests show me that the tapers are not quite perfect yet.
Because of the improvement, this tablet receives a pass-ish here.
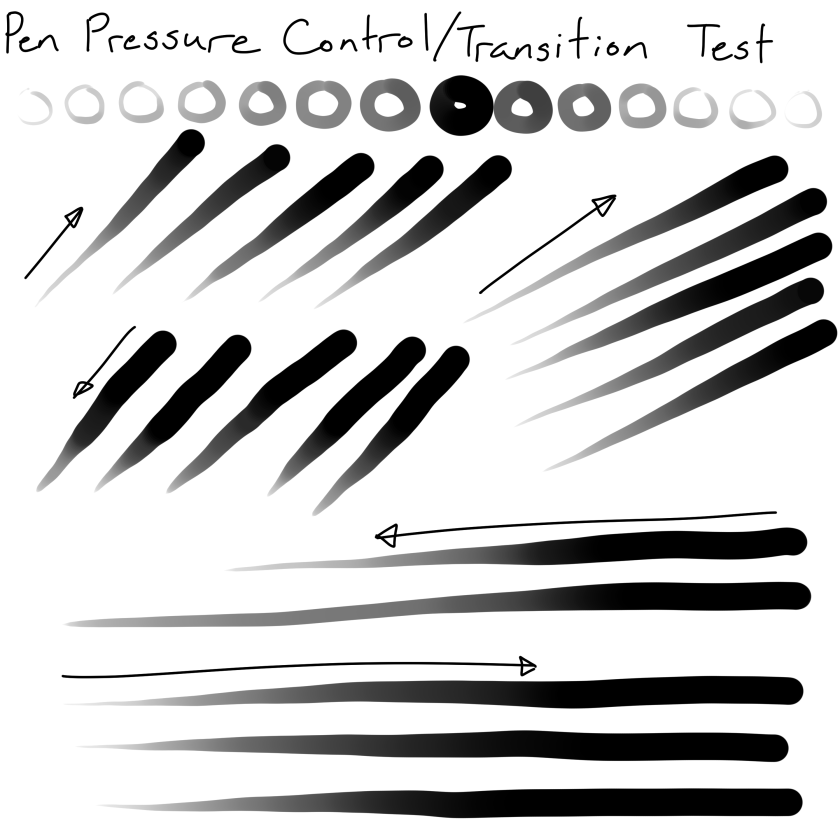
5) Pen Pressure Control/Transition Test – Grade: Pass
Test pen 1 – 100px – pen pressure: size+opacity
This section is to test the smoothness of the transitions in pen pressure.
-The circles at the top are one of Youtuber Brad Colbow’s tests. It is used to check if you can properly control the pen pressure all the way around a circle. If there is a pressure jump, some circles will feel impossible to control due to that jump.
-The lines at the bottom are slow strokes done with smooth increases or decreases to pen pressure in mind. The arrow points in the direction which the stroke was done, and the smoothness of the gradients show how smooth the pen pressure transitions.
In terms of the pen pressure control circles, I had some issue trying to get the thinnest circles done consistently, however, all the rest of the circles were easily accomplished with fairly good consistency.
I will give this tablet a pass here since there don’t appear to be any noticeable issues in the pen pressure transitions either.


6) Initial Activation Force & Lightest Pen Pressure Test – Grade: Pass-ish
Test pen 1 – 300px – pen pressure: size
This test tries to demonstrate the IAF of the tablet, and also shows the lowest possible pen pressure the tablet is capable of producing consistently.
IAF is the amount of force necessary to cause the pen to output a line. Ideally, your tablet will have an extremely low IAF where the pen will output a line with the least amount of force possible.
A high IAF causes issues such as light pen taps not registering as clicks, and the inability to sketch very lightly, both of which become quite annoying the more you experience it.
For this test page, the squiggly lines should begin right on the start line.
-If the line begins right on the start line, this indicates that the IAF is extremely low (low IAF is best) and the line just appears naturally without effort.
-On the other hand, if the line does not begin on the start line and instead begins further along the stroke, this means that the IAF is high so I needed to search for the IAF by increasing my force little by little until I finally started outputting a line.
An example of the ideal test page is the Huion New 1060 Plus (2048) IAF test page which I included above for comparison. Almost all the lines begin right on the start line meaning it has extremely low IAF, and the lines are almost transparent showing that the tablet is capable of drawing extremely light pen pressures.
The XP-Pen Innovator 16 has a semi-low IAF which doesn’t begin right when the nib touches the screen. As you can see, I was not able to get the lines to start on the start line consistently, but I was able to start them pretty close to it almost every time.
Basically, the IAF is low enough that I don’t consider it an issue, but it is certainly not perfect.
In terms of the lightest pen pressure, I will admit that I had a fairly hard time getting a super thin line using the 300px test pen. The thin lines done with this tablet obviously pale in comparison to the Huion New 1060 Plus (2048) IAF test page which is the ideal, but this thinness is decent when not using a 300px pen and is acceptable.
Overall, the XP-Pen Innovator 16 has an acceptably low IAF and is able to draw acceptably thin lines. This tablet gets a pass-ish here since it could be better.
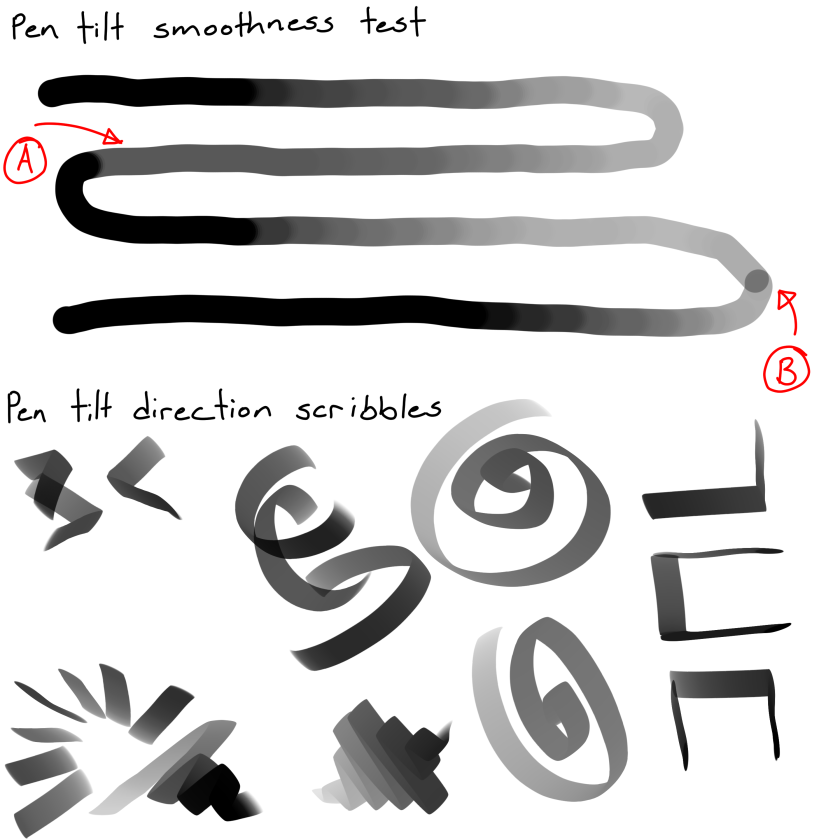
7) Pen Tilt Test – Pass-ish
Test pen 1 – 100px – pen tilt: opacity
Test pen 2 – 100px – flat pen – pen tilt: direction
This test shows the smoothness of the pen tilt by gradually tilting the pen while slowly moving the pen to the side. This section also includes scribbles using the pen direction determined by pen tilt.
As you can see in the smoothness test, the pen tilt transitions on the XP-Pen Innovator 16 are not particularly smooth. You can see all the steps in the gradient, and there were some places where the pen tilt stopped working for a brief moment.
Fortunately (or unfortunately), XP-Pen doesn’t specify the number of pen tilt levels they have on the XP-Pen Innovator 16’s product page, so they aren’t lying about “having” pen tilt, but you can clearly tell it’s not particularly high quality pen tilt.
This tablet will get a pass-ish here since they have pen tilt, but it’s not very high quality.
Overall
So all in all, the drawing test results are:
1) Scribble Test – Pass
2) Slow Ruler Line Test – Pass
3) Quick Hatching Test – Pass
4) Short Release Taper Test – Pass-ish
5) Pen Pressure Control/Transition Test – Pass
6) Initial Activation Force & Lightest Pen Pressure Test – Pass-ish
Non-Vital Drawing Tests:
7) Pen Tilt Test – Pass-ish
Ideally, all the above tests should have at least a “Pass-ish” for their grades because the most vital function of a drawing tablet is to draw properly and predictably. Failing any of these tests means that it doesn’t do that.
The drawing experience!
The actual drawing experience on the XP-Pen Innovator 16 was quite enjoyable. The pen pressure worked as expected for the most part, and no issues occurred during the creation of my drawing.
I certainly noticed that I sometimes had to tap harder than expected to click something because of the slightly higher IAF, but it was never bad enough that I thought the IAF was an issue.
An interesting thing to note is that the screen does not get warm anywhere. The warmest part is actually not even on the screen and is on the bezel beside the shortcut keys, which is to be expected as that’s where the cable is connected to the tablet.
Oddly enough, I don’t actually have anything else to comment on for the drawing experience. It worked as expected while I was drawing on it and nothing stood out to me as an annoyance.
I suppose that’s a compliment coming from me considering I’m rather critical of every small thing that annoys me about a tablet.
Conclusion
The XP-Pen Innovator 16 is a very good tablet which is certainly worth your consideration if you’re interested in its slim and sleek looks.
I feel like the 500 USD price tag is somewhat high, but I suppose that’s a reasonable price considering the great build quality with its metal alloy body.
For me personally, I feel like the selling point of the Innovator 16 is the fact that it comes with good colour calibration out of the box.
The 9mm thinness which they advertise certainly makes the tablet slim and sleek, but I’ve never really been aboard the “make it thinner” hype.
Another selling point would be the shortcut keys accompanied by the dual wheel. Compared to most other 15.6-inch drawing monitors options, 8 button sand 2 wheels is quite a lot. So if you want to mainly stick to using shortcut keys on your tablet, this tablet might have enough for you to work comfortably with just shortcut keys.
It’s a bonus that the shortcut keys and wheel feel great to use because of how well they’re built.
If you’re looking for a good, fairly large drawing monitor as a workstation that you can carry around, the XP-Pen Innovator 16 is certainly a looker which performs quite decently even among the many 15.6-inch options currently available in the tablet market.
Places to buy the tablet
Here are the links to the anniversary edition Innovator 16 on XP-Pen’s webstore. It is the same price as the normal Innovator 16 during the anniversary sales!

Never know there’s Huion Kamvas Pro 16 tablet included in the packaging…
I Hope Huion and XP Pen make less product and focus more on fixing the old problems…
LikeLike
Hey, thanks for pointing that out mistake. I struggled to fix it for a while because WordPress’ new editor wasn’t cooperating, but it’s fixed now.
I agree with you. I wish they would focus more on old issues too.
LikeLike
Hey i’m having a problem with Pen tapering like the last XP-Pen Artist 15.6 Pro. What’s yout tablet driver version on your XP-Pen Innovator 16?
LikeLike
Hi there,
I used driver ver1.6.4.200810 for my review. I have not tested the new beta UI driver ver3.0.4.200924.
As I mentioned in my review, although it looked slightly better than before, the tapering was not fixed at all. The reason I did not notice it during my drawing was probably because my own drawing style changed since my last review and it did not involve as many quick taper movements.
-Nikage
LikeLike
Hi!
I was wondering if you would recommend this over the huion kamvas pro 16.
Im a light handed person when it comes to digital art so the huion kamvas pro 16 might be better for me because of the low iaf but i noticed on your review on the huion tablet the Delta-e(idk what it’s called but i think it’s this?) was very high and i dont have a color calibrator to calibrate it and knowing i need to plug it in an outlet/power bank would be a pain because the desk where i draw doesn’t have an outlet nearby and i don’t really have a power bank.
but i feel like i should get the huion because of the low iaf but im not so sure.
LikeLike
Hi there,
Personally, I would recommend the Huion Kamvas Pro 16 over the XP-Pen Innovator 16 for its better IAF.
In terms of the colour accuracy, since the colours are all relatively consistent in the “too bright” direction, I believe lowering the backlight setting should make it closer to the sRGB calibration. The default colours aren’t “horrible” as none of the delta-E’s cross 10, so I believe they would be workable.
In terms of the power plug, perhaps an extension cable from an outlet elsewhere in the room would work. Personally, I would recommend trying to change your working area to allow you to reach an outlet with the Huion Kamvas Pro 16, rather than getting the XP-Pen Innovator 16 because there’s no outlet nearby, but that’s assuming you have that option.
If that’s not possible, then perhaps the XP-Pen Innovator 16 will be the choice made from necessity.
For your additional questions:
-Yes, the Innovator 16 is good at keeping the same pressure while drawing a line. It didn’t make it any harder than any other tablet I’ve tried.
-The Innovator 16 did not scratch during my usage.
I hope that helps,
Nikage
LikeLike
Thank you!
that really helped.
LikeLike
I already commented but i forgot to add this.
Is the innovator 16 good at keeping the pressure while drawing a line, curve and wiggly lines?
LikeLike
Quick question: would you recommend this over the huion kamvas pro 16?
LikeLike
Also does it scratch easily or has it scratched in your time of usage?(the innovator 16)
LikeLike
Hello!, it’s me again.
Just wondering, will you be having a review on the huion kamvas 13?
just a question though
LikeLike
I feel so bad for asking so many questions but i noticed that on every screen tablet theres that screen protector you have to take off. do you really need to take it off? like i know i wont experience the matte screen protector and that theres a screen protector if you remove the protector you have to take off but can you still use it with it still there?
LikeLike
correct me if I’m wrong but i believe the screen protector is there to provide a matte texture for drawing with! you wouldn’t need to remove it unless you want to replace it or access the smooth glass surface for some purpose.
LikeLike
Hi there,
You can most certainly draw on a tablet even with the packaging protection sheet still on it, however, the experience drawing on that is not nice whatsoever because it is just a plastic sheet not made to be drawn on. From personal experience, I would recommend against doing that just from the perspective that it’s doesn’t feel good to draw on.
-Nikage
LikeLike
HI there,
Unfortunately, I have no plans to review the Huion Kamvas 13 any time soon. Sorry!
-Nikage
LikeLike
You mention that the device is heavy despite its thinness – I know that this is at least partly due to the metal casing, but I was wondering if you could give a rough idea of exactly how much it weighs. It would factor into my decision between this and the Artist 15.6 Pro, but I can’t find any information on its weight.
LikeLike
HI there,
Thank you for pointing out that XP-Pen does not mention the weight in their specifications.
I measured the weights of the two tablets in question for you.
The Innovator 16 weighs 1.379kg.
The Artist 15.6 Pro weighs 1.521kg.
-Nikage
LikeLike
Thank you!
LikeLike
hi! would you reccomend this tablet over the Kamvas pro 16 or the xp pen pro 15?
LikeLike
hello! thank you for your review! may i ask….does the analog scroll wheel have clicks to control the amount you spin it, or is it completely smooth? (i hope that makes sense) is it easy to control and tactile? thanks again~~
LikeLike
Not Nikage, but as an owner of this device I may have an answer.
Physically, the analog scroll wheel has a completely smooth rotation; it has little enough friction that i can spin the wheel into a full rotation with as single push, with enough effort – at the same time, the wheel will stop moving when you let go under the majority of circumstances. The edge of the wheel is beveled, but the slope does not finish flush with the panel or the touch dial (the dial raises about 0.5mm from the analog wheel; the wheel itself has 1mm of surface below the bevel and another 1mm of space between it and the panel). When I use it, my fingers comfortably grip the outer edge of the bevel, which does not leave even a temporary mark unless I use more force than is required to push the wheel. Use of fingers is also not required… I could even use either end of my pen to push the wheel if i place it against the gap, but this would scratch up my pen over time because of the panel’s texture.
The only ways your pen display will indicate that you have rotated the wheel enough to perform its predefined action are:
– by optionally showing a visual message for every received input from your pen display (I believe this is only an option with the new UI; I’ve been using the latest Linux driver as of this post)
– when the action is performed. For the actions I have programmed this is more than enough feedback for me.
I can also tell you that with Linux at least (though I see no reason that this should be different for other OSes at this point), the scroll wheel performs its programmed action roughly 24-26 times in a full rotation. I can’t give an exact number though, because I’m measuring this by hand. It looks like it takes about 1cm of movement from the outside edge.
I hope this helps you!
– Quinn
LikeLike
Thanks for review, though unrelated question but can you try new ui beta driver if needed? I’ve heard there are good things and bad things such as good ui design, ability to map mouse and keyboard shortcut and 4 slot instead of 5 slot, etc. It’ll be cool to see your thoughts in future reviews.
LikeLike
Well, it’s been a while.
Your job must have been giving you rough time, and combine that with Coronavirus plus the overwhelming amount of newly released Pen tablet+Display, your decision to stop reviewing is no longer surprising. Good for you.
Mine H950P is doing just fine,
no pen nib wear and no texture wear. But maybe I can see some kind of “wear” along the middle. Can’t feel the difference tho, no matter how hard I tried.
Still, I’m kinda disappointed that the retail price got reduced a Lot recently. (Even though right 2-3 month after I bought it in 2019, the price got increased due to COVID-19). I guess being too greedy is a bad habit.
I’m still hunting used recent display tablet for the future. Would be lucky to find underprice/wrong priced one. But H950P is decent enough for now.
Speaking of recent tablets, All of them still can’t deliver straight slow ruler line. Except for Xencelabs, But the body design is just “meh” for me (but RGB active area sound nice until we got bored of it).
Another case of employees and former company team leaves and build another company.
Wacom and Xencelabs, just like Zowie and Vaxee.
Anyways, that’s all I got to say. Hopefully you can survive and be successful in this pandemic.
LikeLike