
(May 26, 2019) Update: I have updated this review with the new Drawing Tests sections which I have recently started doing in my reviews.
The conclusion of this review is unchanged. It is a perfectly viable choice for those who are looking for a really affordable drawing monitor, but it does have its drawbacks you should make sure to take note of when considering it.


Please note that the tablet stand which you see in this review (XP-Pen AC18) is sold separately and does not come bundled with the tablet. However, if you buy the XP-Pen Artist 12 directly from XP-Pen’s store (XP-Pen Store link), you can get a 10 USD discount on the XP-Pen AC18 stand if bought together with the tablet.
The XP-Pen Artist 12 is XP-Pen’s newest addition to their growing lineup of drawing monitors. It is the first (and only) 12-inch tablet currently out in the drawing monitor market, and due to it’s slightly smaller size, it costs less than all the 13-inch competition making it quite an appealing option for artists who want a screen on their tablet but don’t have a particularly large budget.
The specifications given for this tablet are all quite good, but of course, the specs written on paper are almost never a good indicator for real life performance. Hopefully, with my review I can help you understand the actual drawing performance you can expect from this tablet.
For this review, XP-Pen kindly supplied me with an XP-Pen Artist 12 for review purposes. Many thanks to them for offering me this opportunity.
As usual, my reviews are written based on my honest thoughts and opinions, and I never agree to review a product if I am required to only say good things about it.
If you believe receiving a review product for free makes the review biased, now is a good time for you to stop reading.
Anyways, onto the review!
Please note!
-I am not a Mac or Linux user!! I only tested this tablet on Windows 8.1 and Windows 10.
-Prices may have changed since I wrote this review.
-Check when a review was written. Some aspects may improve or change over time, so it is in your best interest to concentrate on reviews which are less than 1 year old.
-Always check multiple reviews to cross reference their information before you make a conclusion about a tablet.
Table of Contents
- How good is this tablet?
- Specifications at a glance
- What’s in the box?
- Screen quality
- Tablet drivers
- Drawing tests
- The drawing experience!
- Conclusion
- Places to buy the tablet
How good is this tablet?
Design choices: Quite nice.
-Nitpicks: Single pen button, pen button is flush with the surface of the pen
Hardware quality: Mostly sturdy.
-Nitpicks: Cable port seems like a weak point, touch bar is not particularly sensitive
Screen quality: Decent and usable.
-Nitpicks: Somewhat low colour gamut
Tablet drivers: Quite good!
-Nitpicks:
Drawing test results: Mostly good!
-Nitpicks: Quick tapers are not smooth
Actual drawing experience: Fairly good!
-Nitpicks: Pen eraser has no pressure
Overall: A decent option, especially for its price!
My verdict:
-If you are considering this tablet, it is a perfectly viable choice for anyone who wants a screen on their tablet for a pretty low price. It’s not a perfect tablet though, so you should make sure to take into consideration the issues I mention in this review, but it certainly delivers more than acceptable drawing performance.
*I repeatedly say the XP-Pen Artist 12 has a pretty low price because it surprisingly costs less than a Wacom Intuos Pro M (350 USD), which is a standard screen-less tablet with no screen built into the tablet.
Specifications at a glance
Price: 249.99 USD (when this review was written)
Active Area: 10 x 5.7 inches, 11.6 inch diagonal
Resolution: FHD 1920 x 1080 (16:9 ratio)
Display Type: IPS, gamut = 72% NTSC on product page
Pen Type: Battery-free
Pen Buttons: 1 side button, eraser on end
Pen Pressure: 8192
Pen Tilt Sensitivity: None
Shortcut Keys: 6 buttons, 1 touch bar
Multi-touch: No
Other features: Tablet stand NOT included.
Again, please note that the tablet stand which you see in this review (XP-Pen AC18) is sold separately and does not come bundled with the tablet. However, if you buy the XP-Pen Artist 12 directly from XP-Pen’s store (XP-Pen Store link), you can get a 10 USD discount on the XP-Pen AC18 stand when bought together with the tablet.
What’s in the box?


The tablet comes in a nice looking white box with a unique design. There isn’t anything particularly important on the back of the box aside from a repeat of the specifications.
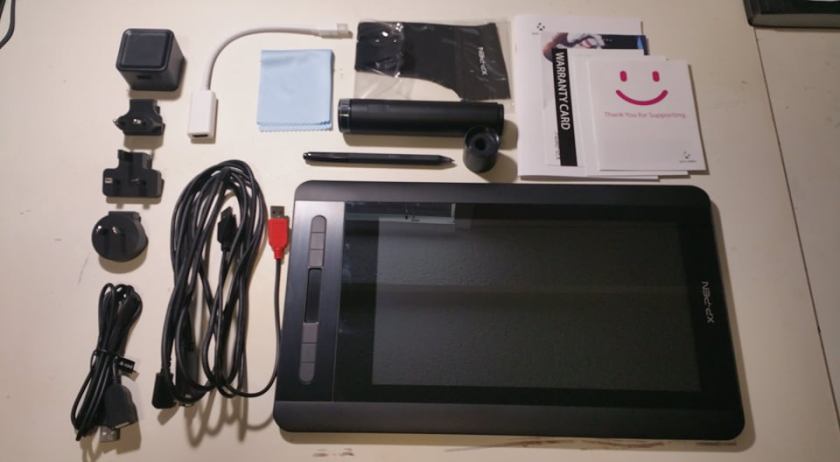
The things that come in the box:
- XP-Pen Artist 12 tablet
- XP-Pen P06 battery-free pen
- Pen case
- Combined cable (USB type-C to USB type-A, HDMI, and USB type-A for power)
- USB type-A extension cable (for power)
- USB power adapter
- Outlet adapters for international power outlets
- HDMI to Mini-DisplayPort adapter
- Pen nib replacements x8
- Anti-fouling glove
- Screen cleaning cloth
- User manual
- Warranty policy and warranty card
- “Thank you” card
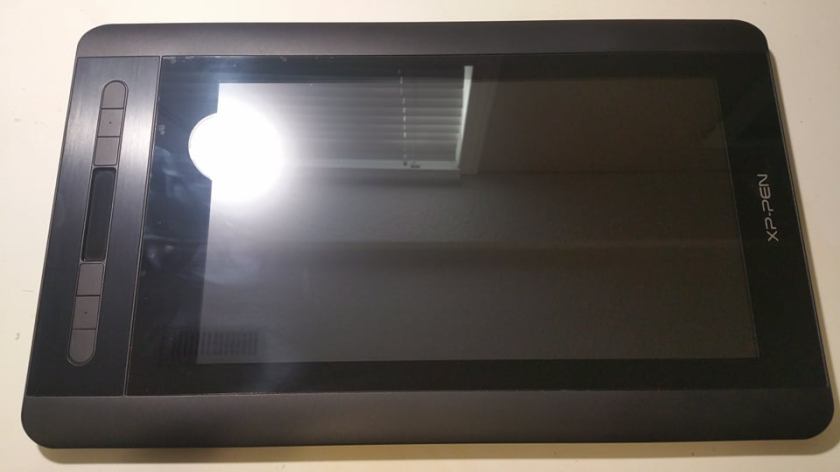
The XP-Pen Artist 12 sports a fairly simple design overall.
The tablet comes with a pre-applied screen protector which has a very minimal amount of texture. I don’t think it’s an anti-glare screen protector because it doesn’t blur reflections at all, but XP-Pen’s product page says it has an anti-reflective coating.
Personally, I would have liked it to have a bit more texture, but I was able to draw without any problems on it anyways.
Any air bubbles you see under my screen protector are caused by me removing the protector a bit to see if it impacts screen quality. Originally, it came with no air bubbles under the screen protector.
The tablet itself feels quite sturdy when I perform the twist test, where I grab both sides of the tablet and try twisting the tablet a bit with just my hands.
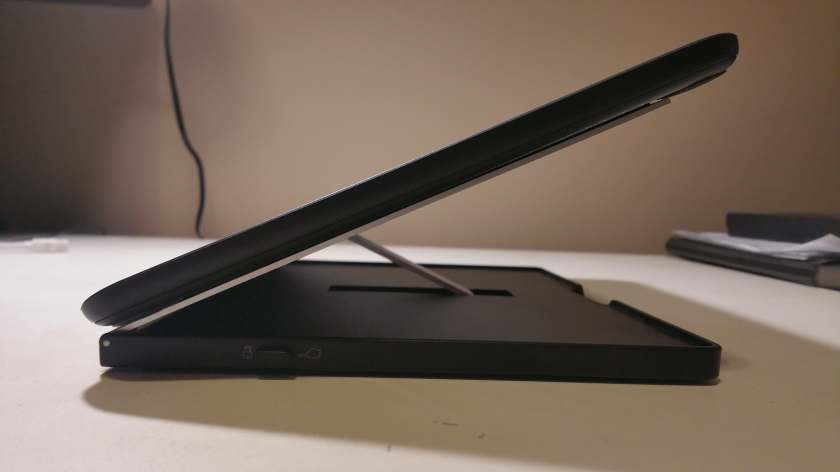
This tablet is quite thin and should fit into most 15.6-inch bags or bigger. Despite having a slightly smaller 12-inch screen, the overall size of the tablet is roughly the same as a 13-inch tablet due to the decently large bezels.
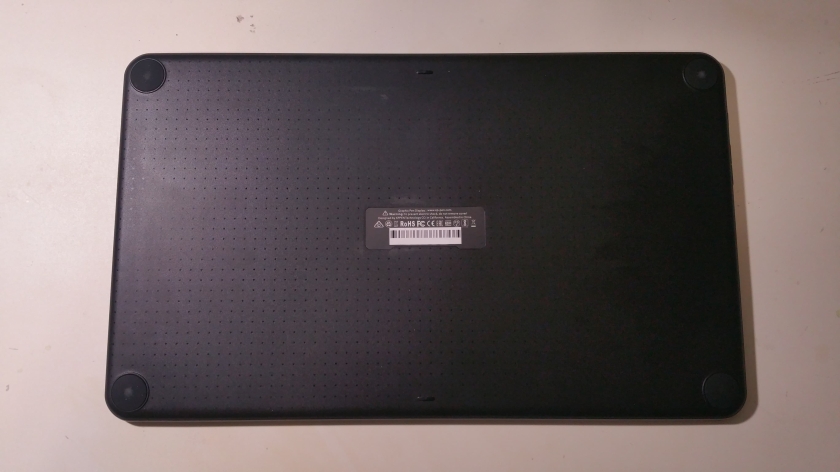
On the back of the tablet, there are 4 rubber feet as well as 2 little plastic bumps in the middle at the top and bottom (I assume this is to support the middle of the tablet). The back of the tablet is made from all hard plastic.
Aside from that, there’s just the usual information sticker in the middle.

Along the side of the tablet there are 6 shortcut buttons and 1 touchbar. All the buttons have a fantastic feel to them, being tactile as well as easy to press, and they’re also not particularly loud. I didn’t like the shortcut buttons on the XP-Pen Deco 03, but these ones on the XP-Pen Artist 12 are fantastic.
These shortcut keys also have anti-ghosting capabilities, meaning you can press multiple buttons at once and have them all work. This may seem like a given, but not every tablet company does this (cough Huion cough).
The touch bar is made of smooth plastic which is nice to slide your finger on. Unfortunately, using it is a different story. One whole slide with your finger from one end to the other only activates two clicks of the function assigned to the slider. Because of this, you have to slide your finger over it multiple times if you want to make a big change, which is really annoying and tiresome.
I have confirmed with XP-Pen that this is not a defect with my tablet. They confirmed that the touch bar is made to only activate two clicks of a function in one swipe and Brad Colbow also mentions this inconvenience is his Youtube review (Youtube link).
I did not use the shortcut keys while using the tablet because I simply do not find 6 buttons (plus only one pen button) to be enough for all my functions.
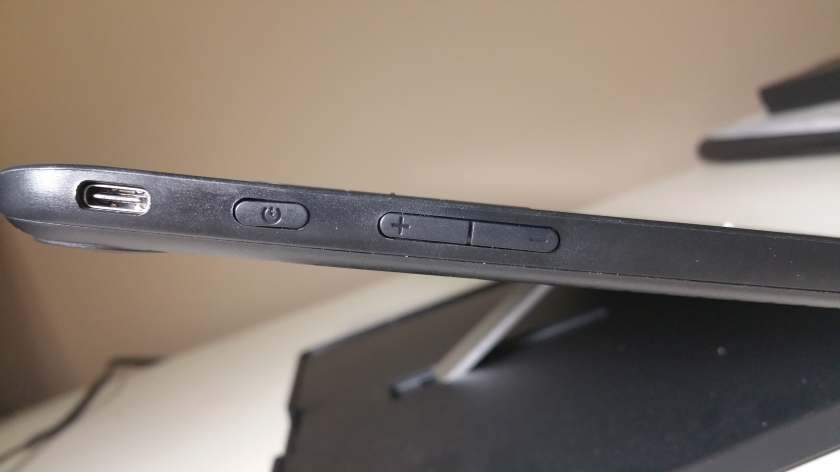
This tablet has 3 buttons along the side which are for power, brightness up, and brightness down. The tablet itself does not have an OSD settings button, but you can change the screen colours through the XP-Pen driver software.
The power button will glow with a dark blue light to indicate that the tablet is powered on.


The XP-Pen Artist 12 has a USB type-C port on it to connect to the combined USB/HDMI/power cable. I praised the choice of a USB type-C cable on other tablets before, but the way it was implemented on this tablet is not particularly smart.
The point of using USB type-C on a tablet would be to make the cable flippable for use in left-handed mode. On the XP-Pen Artist 12, the cable is certainly flippable, but it actually ends up going over the power button if you flip it.
I can still fit my finger in beside the cable and click the edge of the power button to turn the power on, but this is quite a mistake in the design of the tablet.
It’s also important to mention here that there is no structural support for the USB type-C port on the tablet, so I am worried that the weight of the cable will slowly but surely start breaking the port as time goes by. This is why I did not say that the build quality of this tablet is perfect, despite every other part of the tablet being quite sturdy.
A small note from my experience: When you first connect the tablet, you will probably want to connect the L-shaped cable pointing away from the power button. I had mine plugged in toward the power button and my Windows 10 computers just wouldn’t recognize that the tablet was a USB device no matter how many times I unplugged and replugged it.
I couldn’t figure out what the issue was at all, and only when I plugged in the L-shaped cable the opposite way, pointing away from the power button, did my computer finally recognize the tablet. After it recognized it once, I was able to flip the cable back around and have the tablet work that way as well.
It’s a weird issue that is most likely isolated to just my tablet, but if you run into that issue with the L-shaped cable plugged in towards the power button, then you may want to try plugging it in the opposite way.
You should contact XP-Pen support if this happens to you as it’s likely a hardware defect which you can get replaced under the 1 year warranty.
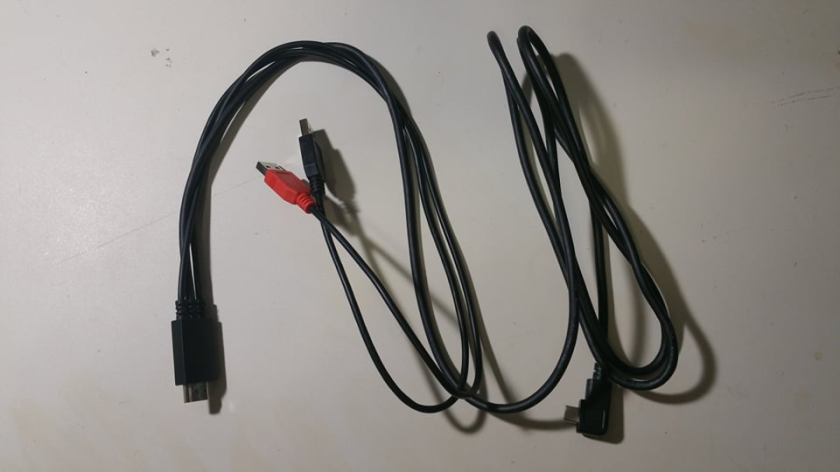
The included cable is a combined cable which goes from USB type-C on the tablet to USB type-A and HDMI on the computer. The tablet can be powered solely by the computer if the USB port can provide enough power, but if it can’t, the extra red USB type-A connector will need to be connected to another USB port on your computer, or a power outlet using the included power outlet to USB adapter.
The HDMI portion of the cable is where all the cables come together, so I will give measurements of the cable length from there.
-The HDMI to USB type-C is ~170cm.
-The HDMI to USB type-A is ~58cm.
-The HDMI to USB type-A power is ~200cm (this includes the USB extension cable).


This is the XP-Pen AC18 stand which is sold separately.
It has a metal backplate with rubber pads to hold the tablet in place, and a plastic base with a mechanism that can do many angles between 0 and ~70 degrees.
The only thing to note is that the metal plate is heavy and could hurt if you release it onto your fingers (as shown by the warning sticker), but you should be fine as long as you’re not careless.
It’s sturdy and portable and I think it’s a good stand. I can certainly recommend getting it for use with the XP-Pen Artist 12.


The tablet comes with a unique hexagonal battery-free pen. It’s made of a soft matte plastic for the grip, smooth plastic for the top, and clear plastic on the tip so you can enjoy looking at the metal coils used to power the pen. The pen itself is fairly nice to hold.
Unfortunately, the pen only has a single pen button unlike most other tablets which have two pen buttons. Having a pen eraser tip does not make it so that you can take away a pen button!
The pen button is also completely flush with the surface of the pen making it impossible to find it without taking your eyes off your screen and looking at the pen to search for the button.
The rationale for using this type of pen button which is flush with the surface is apparently so people don’t click it accidentally.
I personally do not think that this is a good reason because a flush pen button just makes it impossible to find and use the pen button without looking away from your screen, which in turn disrupts your workflow. Isn’t it much better to have protruding buttons which you might click accidentally sometimes, but can actually use quickly and efficiently without taking your eyes off your work? (Unlike a flush button which you won’t be able to use conveniently at all?)
This pen also has a pen eraser tip, but it is extremely insensitive to pressure so I do not think you should take it into consideration when looking at this tablet. I will talk more about this in the drawing experience section.
I am not a fan of this pen at all because of the single pen button, the flush design of the button, and the worthless pen eraser. I personally wish they had just used the P05 pen for this tablet, just like they did with the Artist 13.3 and Artist 15.6.


The tablet comes with a pen case which I like quite a bit. The lid becomes a pen stand, and all the pen nibs are stored on the opposite side. The pen case also helps with carrying around the pen safely with your tablet if you take it out with you.
Screen quality
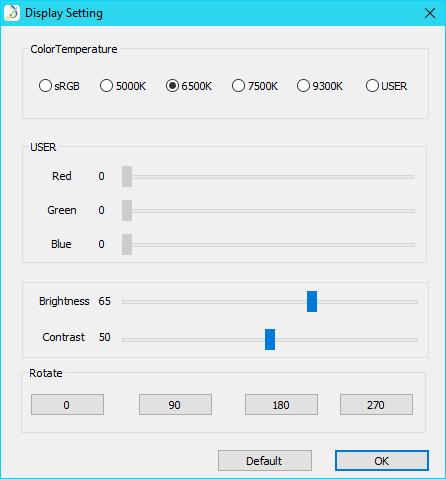
The XP-Pen Artist 12 has decent colours out of the box, but they are clearly not calibrated and have fairly strong blues out of the box.

To access the colour settings, you will need to install the tablet driver, then click the ‘Display Setting’ button in the bottom right. In the screen that pops up, you will be able to adjust the colours, brightness, and contrast. You can also rotate the display from this window.
Above are my settings which are roughly sRGB. You can use those settings to roughly calibrate your XP-Pen Artist 12 if you get one, but I am not sure how similar the colours are between my device and others, so it might not be the right settings for all XP-Pen Artist 12 devices.
The IPS display on this tablet is quite good and you can view the colours from the sides without any noticeable changes in the colour.


Based on two calibration runs, the actual colour gamut of the XP-Pen Artist 12 appears to be ~87% sRGB and ~60% AdobeRGB. This is actually a fair bit lower than the advertised 72% NTSC which roughly equates to ~100% sRGB.
This is also fairly similar to the colour gamut which Teoh Yi Chie measured in his review which was 92% sRGB, 68% AdobeRGB, and 63% NTSC. You can also check out his review on his site: ParkaBlogs Link
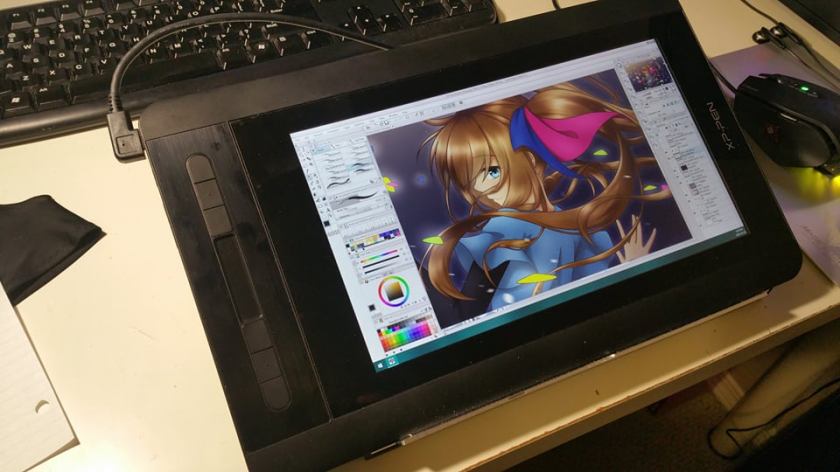
Comparing it to my other monitors which are fairly close to 100% sRGB, I can certainly see differences in some of the colours being displayed. This took away some of my confidence when picking my colours directly on the tablet. However, based on the drawing I did solely on this tablet, it appears that it did not affect my colours too badly.
Personally, I believe wholeheartedly that any art-oriented drawing monitor should have at minimum 95-100% sRGB (because sRGB is the standard used on the internet).
I believe all companies should make an effort to make their drawing monitors with screens that at least meet this standard because it makes absolutely no sense for a drawing monitor to be lacking in this aspect. The screen is absolutely not the place to cut costs with these tablets when they are supposed to be specifically made for drawing.
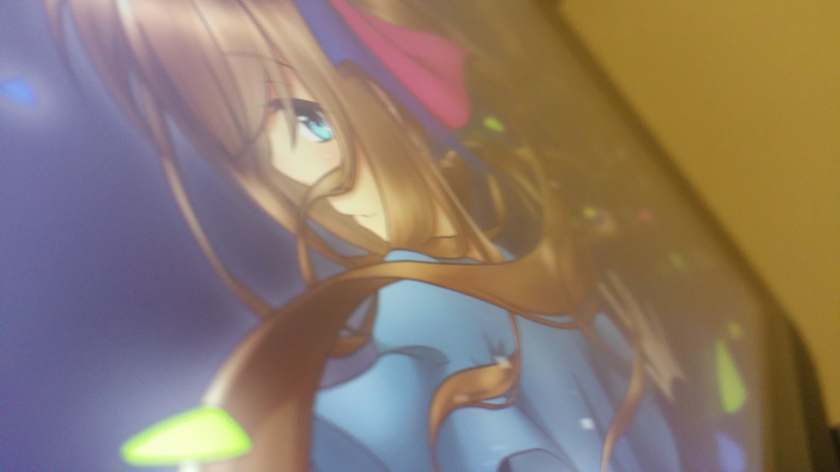
This was the best photo of the parallax I could take with my phone.
The parallax on the XP-Pen Artist 12 is reasonably small. The glass is certainly there, but the parallax is much less than I was expecting. I did not find it a problem drawing with this amount of parallax, especially since the default calibration was pretty spot on.
Tablet drivers
The XP-Pen tablet drivers are extremely easy to install. Just go download the latest version directly from XP-Pen’s site and remove all other tablet drivers you have on your computer before installing it.
![]()
Once you’ve installed the driver and plugged in your tablet, the XP-Pen driver icon should appear in the system tray in the bottom right. You can access the tablet settings by clicking on that.
If the installer doesn’t prompt you to restart your computer after it finishes, I wholeheartedly suggest restarting your computer anyways to allow Windows to properly update the files necessary for the driver to run smoothly.
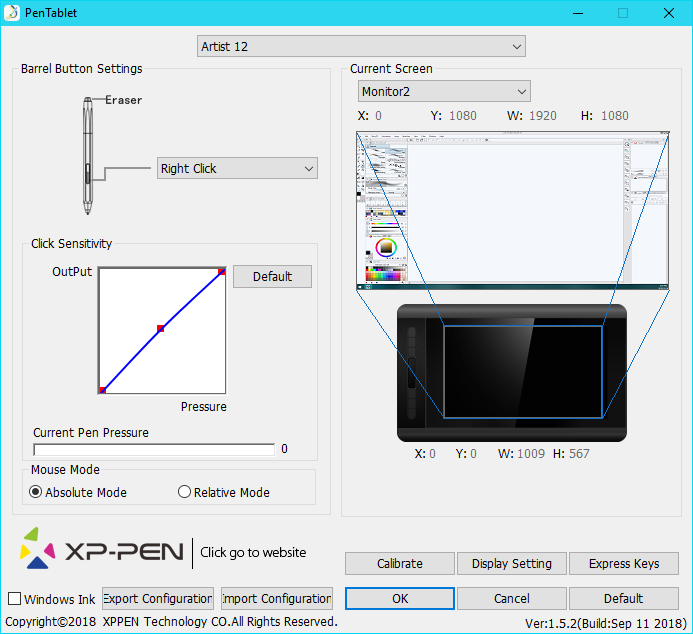
The XP-Pen driver is a simple one page driver with all the important settings in just one window. Here you can set the pen buttons and pen pressure, and choose which monitor the tablet maps to.
I did not need to change any of the default settings as the tablet worked very well with the defaults. I also did not need to calibrate the pen because the cursor properly appeared directly under the pen by default (which surprisingly isn’t the case for some tablets).
You may need to check the Windows Ink checkbox if you use programs such as Photoshop which require Windows Ink to be turned on for pen pressure to work.


The Barrel Button Settings section lets you choose the function assigned to the pen button. The pen eraser cannot be reconfigured.
You can set basically all keyboard or mouse shortcuts that you can think of using the function key option, but you unfortunately cannot combine mouse clicks with keyboard keys in the same function.
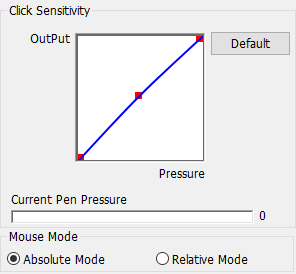
The Click Sensitivity section allows you to manipulate the pen pressure curve directly. For this pen, I didn’t find the need to change anything as the pen pressure was decent at default, but the pen pressure graph is extremely useful for making subtle changes to your overall pen pressure.
A cool thing to note is that the only other tablet drivers with this custom pen pressure graph is Wacom’s Intuos Pro and Cintiq drivers. Wacom’s low-end Intuos tablets do not offer you the pen pressure graph, and none of the Wacom alternatives aside from XP-Pen offer it either!
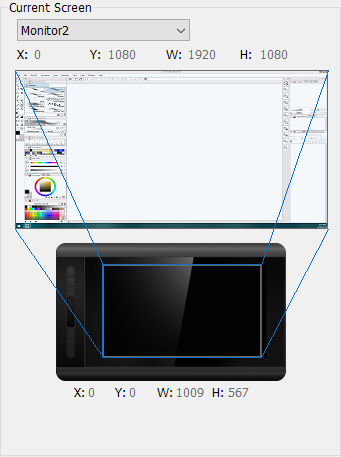
The Current Screen section controls which monitor your tablet is mapped to, and what area of your tablet is used.
If you noticed earlier, there was a function called Switch Monitor among the functions you could assign to your shortcut keys. That function cycles through all the available monitors in the drop-down list at the top of the Current Screen section when used, so you can use that to switch which monitor your pen input goes to.


If you click the Express Keys button in the bottom right, a new window will open up with the options for changing the functions assigned to the shortcut keys.
You can click the Dial tab to change the functions assigned to the touch bar as well.
All the buttons can be assigned mouse clicks, keyboard functions, or the extra functions, just like the pen buttons.
The bar along the top of this window allows you to make program specific profiles which will only be active when the program you assigned is your current active window. It is a useful feature for people who want different functions for different programs.
Unfortunately, if you intend to assign multiple functions to the touch bar, you will need to assign one of the shortcut buttons to the KL/KR Switch Function to allow you to toggle between the multiple functions assigned to the touch bar. This means that you effectively only have 5 shortcut keys to work with instead of 6.
Personally, I would prefer to have 4 more buttons in place of the touch bar since buttons do not require the use of a shortcut button solely for the KL/KR Switch Function, and because they are much quicker to use than toggling through multiple functions on a single touch bar.
The Display Setting button pulls up the colour settings, and you can also rotate the display for left-handed use here.

The Calibrate button brings up the pen calibration which is a 5-point calibration using the 4 corners and the middle. You can click Esc on your keyboard to cancel and exit the calibration.
Also, make sure to export all your settings before doing the calibration as there is no way to reset only the pen calibration. You can export your settings with the export configuration button in the bottom left of the main driver screen.
To reset the calibration, you need to click the Default button in the bottom right which resets everything, not just the calibration.
I did not play with the calibration tool as the default calibration was perfect for me, and I assume the default calibration will be just as good on other XP-Pen Artist 12s.
Drawing tests


These pen tests are all done with the same settings for both the canvas and the pens. These tests are only done in Clip Studio Paint as that is the only program where I totally understand how to remove all unwanted variables.
If you are worried about whether this tablet will work with your art program, don’t be afraid to contact support to ask them directly.
-The canvas will always be a 3000x3000px 300dpi page (the above test page is a 3000x6000px 300dpi page, so just two pages stuck together).
-The test pens are mostly all 100px linear pressure curve pens. Pen pressure for size and/or opacity is enabled based on the test.
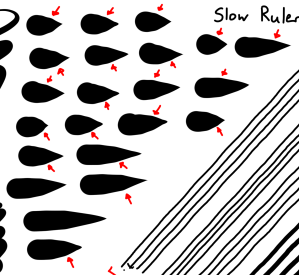
-The slow ruler line test uses a 10px no pen pressure pen to clearly show wobble and jitter. I also use a 50px pen pressure enabled pen to see the visibility of wobble/jitter with pen pressure is enabled.
-The IAF (Initial Activation Force) test uses a 300px linear pressure pen to show the thinnest lines possible, as well as demonstrate the IAF of the tablet.
1) Scribble Test – Grade: Pass
Test pen 1 – 100px – pen pressure: size
Test pen 2 – 100px – pen pressure: size+opacity
For my pen tests, I always start out with a few pen pressure scribbles to see if I can do some nice squiggly lines with increasing pen pressure. I also do some back and forth shading and some spirals with increasing pen pressure.
With the XP-Pen Artist 12, I had no problems doing my little scribbles going from thin to thick. I didn’t have any problems controlling my strokes and making both thin and thick lines was relatively easy. This tablet gets an easy pass here.
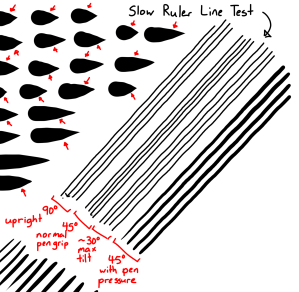
2) Slow Ruler Line Test – Grade: Pass
Test pen 1 – 10px – pen pressure: none
Test pen 2 – 50px – pen pressure: size
The slow ruler line tests done with a no pen pressure pen were quite good at all angles with minimal wobble, but you can clearly see more wobble when tilting the pen completely over.
However, this amount of wobble at max tilt is small enough that it shouldn’t be counted as a problem when drawing. It can be improved, certainly, but it is more than acceptable.
This tablet gets a pass here.
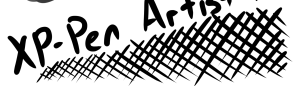
3) Quick Hatching Test – Grade: Pass
Test pen 1 – 100px – pen pressure: size
The quick hatching test is to check whether the tablet keeps up with pen inputs. Usually, the only way to fail this section is if the pen is noticeably laggy and causes unwanted inputs like fishhooks at the beginning or end of the line.
As you can see, this tablet appears to have no problems with fishhooks. I also never noticed the cursor lagging so far behind the pen that it was a problem, so it gets a pass here.
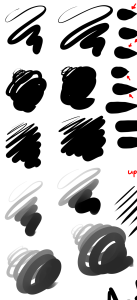
4) Short Release Taper Test – Grade: Fail
Test pen 1 – 100px – pen pressure: size
This test is meant to see the smoothness of the pen pressure taper when going from max to min pressure quickly. Basically, you press your pen down hard then flick to the side to see how smoothly the stroke tapers.
With the XP-Pen Artist 12, the short tapers are not smooth and you can clearly see this, and this issue applies to all very quick tapers that start from max pressure. In other words, it can also happen on longer strokes as well if you are drawing them very quickly.
Fortunately, this is not an issue that you often notice while drawing on the tablet, and most of the time you are not moving fast enough to cause this issue to appear in your longer strokes.
However, this tablet fails this section even if that is the case.
It appears that this is an issue with all of XP-Pen’s current tablets which use the newer drivers (Deco 03, Artist 12, Artist 15.6 Pro, etc). This issue did not occur on any of XP-Pen’s older tablets which used the old drivers (Star03 V1, Artist 22HD, etc).
I have notified XP-Pen about this and they told me they will work on fixing it, but there has been no update regarding a fix yet. This is one of the only issues I currently have with XP-Pen’s products, so hopefully they will move to fix it eventually.
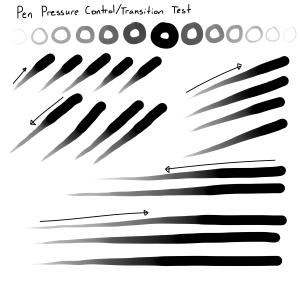
5) Pen Pressure Control/Transition Test – Grade: Pass
Test pen 1 – 100px – pen pressure: size+opacity
This section is to test the smoothness of the transitions in pen pressure.
-The circles at the top are one of Youtuber Brad Colbow’s tests. It is used to check if you can properly control the pen pressure all the way around a circle. If there is a pressure jump, some circles will feel impossible to control due to that jump.
-The lines at the bottom are slow strokes done with smooth increases or decreases to pen pressure in mind. The arrow points in the direction which the stroke was done, and the smoothness of the gradients show how smooth the pen pressure transitions.
In terms of the pen pressure control circles, I had no problems doing all the different circles smoothly. They showed no signs of pen pressure jumping and it was very easy to do all the different line weights.
I will give this tablet a pass here since there don’t appear to be any noticeable issues in the pen pressure transitions either.

 -Ideal IAF Test")
6) Initial Activation Force & Lightest Pen Pressure Test – Grade: Pass
Test pen 1 – 300px – pen pressure: size
This test tries to demonstrate the IAF of the tablet, and also shows the lowest possible pen pressure the tablet is capable of producing consistently.
IAF is the amount of force necessary to cause the pen to output a line. Ideally, your tablet will have an extremely low IAF where the pen will output a line with the least amount of force possible.
A high IAF causes issues such as light pen taps not registering as clicks, and the inability to sketch very lightly, both of which become quite annoying the more you experience it.
For this test page, the squiggly lines should begin right on the start line.
-If the line begins right on the start line, this indicates that the IAF is extremely low (low IAF is best) and the line just appears naturally without effort.
-On the other hand, if the line does not begin on the start line and instead begins further along the stroke, this means that the IAF is high so I needed to search for the IAF by increasing my force little by little until I finally started outputting a line.
An example of the ideal test page is the Huion New 1060 Plus (2048) IAF test page which I included above for comparison. Almost all the lines begin right on the start line meaning it has extremely low IAF, and the lines are almost transparent showing that the tablet is capable of drawing extremely light pen pressures.
The XP-Pen Artist 12 has a fairly low IAF which I could find right away a lot of the time. As you can see, I was not able to get the lines to start on the start line consistently, but I was able to start them directly on it quite a few times.
Basically, the IAF seems to be low enough to not be an issue, but it wasn’t perfectly consistent. However, I never noticed it when tapping options or sketching lightly.
In terms of the lightest pen pressure, I could get fairly thin lines with the 300px IAF test pen. The thin lines on this tablet aren’t quite as good as the lines in the Huion New 1060 Plus (2048) IAF test page which is the ideal, but this thinness is quite good and is more than acceptable.
Overall, the XP-Pen Artist 12 has fairly low IAF and is able to draw quite thin lines consistently. This tablet gets a pass here.
Overall
So all in all, the drawing test results are:
1) Scribble Test – Pass
2) Slow Ruler Line Test – Pass
3) Quick Hatching Test – Pass
4) Short Release Taper Test – Fail
5) Pen Pressure Control/Transition Test – Pass
6) Initial Activation Force & Lightest Pen Pressure Test – Pass
Ideally, all the above tests should have at least a “Pass-ish” for their grades because the most vital function of a drawing tablet is to draw properly and predictably. Failing any of these tests means that it doesn’t do that.
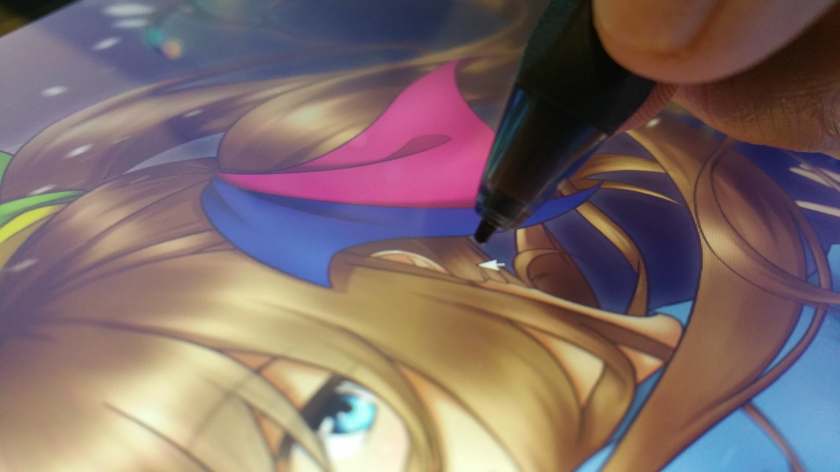
The drawing experience!
The actual drawing experience on the XP-Pen Artist 12 was quite pleasant. The pen pressure worked as expect most of the time and was quite nice to use.
I found that the way the pen nibs move and feel are quite similar to Wacom’s pens, which is actually pretty rare for a non-Wacom tablet. I am not saying this is a good or a bad thing, just that the pen behaves more similarly to Wacom in this case.
One thing that’s hard to demonstrate is the amount of ‘lag’ that the pen input has. Sometimes, there are tablets which have quite a bit of delay between the pen and the cursor, but this tablet has very little.
I believe the cursor is keeping up with the pen as closely as it can on the 60Hz monitor when doing fast sweeping lines, and this is probably close to the least ‘lag’ anyone can manage to achieve with a 60Hz refresh rate IPS monitor.
The one issue with the pen pressure I noticed is the pen tapering issue. As I showed in the Drawing tests section, quick tapers from max pressure do not taper perfectly smoothly.
This is a rather small issue which didn’t affect many situations, but it should still be noted that the taper can sometimes look uneven because of the hiccup issue above.
This issue was really the only thing that made my drawing experience on this tablet imperfect, but it was not jarring for the overall drawing experience.
It appears that this tapering issue is an issue with all of XP-Pen’s current tablets which use the newer drivers (Deco 03, Artist 12, Artist 15.6 Pro, etc). This issue did not occur on any of XP-Pen’s older tablets which used the old drivers (Star03 V1, Artist 22HD, etc).
I have notified XP-Pen about this and they told me they will work on fixing it, but there has been no update regarding a fix yet. This is one of the only issues I currently have with XP-Pen’s products, so hopefully they will move to fix it eventually.
Aside from the pen taper issue, there was really nothing wrong with the drawing experience on this tablet… Oh wait, I forgot to talk about the pen eraser, didn’t I?


The above 3 pages are testing done in Clip Studio Paint (ver 1.8.2), Medibang Paint Pro (ver 19.0), and Krita (ver 4.1.1). The tests are pen pressure, eraser tip, and eraser tip on my replacement P06 pen.
The unlisted Youtube video of me doing this test is here: Youtube link
I previously said that you should not take the pen eraser into consideration when looking at this tablet because it is insensitive to pressure, and the above is why. The pen pressure on the eraser tip is very weird in that it can do some light pressure, but then it suddenly blows out to max pressure.
I admit that I don’t use the pen eraser myself, but when you trade a pen button for a pen eraser, you kind of expect the pen eraser to work nicely… which it doesn’t. I would much prefer a second pen button instead of this kind of pen eraser.
Please note, I have a replacement P06 pen and both of my P06 pen erasers act the same. XP-Pen support also confirmed that this is the normal behaviour of the pen eraser on the XP-Pen Artist 12 by telling me,
“Since the eraser has a large tip, it is difficult to control the touch area on the monitor. So it is normal and we recommend users use the “eraser” end as the eraser not to draw like pen tip.”
Unfortunately, the pressure on the eraser is too random for me to call it usable, and I recommend pretending like this tablet does not come with a pen eraser at all when considering it.
Conclusion
I can recommend this tablet to anyone who just wants a tablet with a screen while paying less than you would need to pay for a Wacom Intuos Pro M, but I don’t think I can wholeheartedly recommend it to just everyone.
If you are considering this tablet, you should take into account the issues I mentioned: Small pen tapering hiccup, lower than standard colour gamut, touch bar insensitivity, and the pen eraser tip issue.
Honestly, if you don’t use the shortcut buttons, touch bar, and pen eraser, this tablet is quite good for its price, especially if you really don’t have the money to spend on anything bigger and pricier.
If you’re just looking for a drawing monitor with a low price, this could be the one. But again, make sure you take into consideration all the issues I mentioned.
Places to buy the tablet
People living in other regions should check their regions Amazon or see if the XP-Pen Store ships to them.
If you have any questions about the tablet, feel free to ask me!

Would you recommend this as a good starter tablet? Thinking of purchasing for my partner, she doesn’t need anything big and it would likely only see fairly light use.
LikeLike
I can certainly recommend it if you can ignore the pen eraser which is basically worthless, and the “good but not great” screen colours. Aside from those two things, I think the low price and good drawing capabilities of the Artist 12 are pretty good as a starter pen display tablet.
LikeLike
Thanks for the quick response! The colour accuracy shouldn’t be an issue as we can always mirror to a calibrated monitor for anything integral.
Thanks again!
LikeLike
Hi Nikage,
Two questions. Does it support hover mode? I use my Wacom with middle mouse button while hovering and it acts as my ‘move’ option in my application. Also, can this tablet support a different pen with 2 buttons?
If you have any info you can provide with, please let me know.
Thanks
LikeLike
Hey there,
Here are the answers to your two questions:
1) Yes, this tablet supports hover mode. You should be able to assign middle mouse button to the pen button and use that while hovering to act as your ‘move’ option.
2) No, this tablet is only compatible with the P06 pen which it originally comes with. It appears to use a different ‘wavelength’ than the other pens, so they are not cross compatible as far as I know.
I hope that answers your questions,
Nikage
LikeLike
Hi I have an XPen drawing tablet and have a fault question. Touching the tablet with the pen produces two cursors on the screen. Any suggestions?
LikeLike
Hey there,
If it’s producing two cursors on the screen, my first thought would be that the USB might not be plugged in properly, or I didn’t remove previous tablet drivers completely from my computer. Since it’s the Artist 12, I would also try reversing the direction of the USB type-C cable that’s plugged into the tablet.
If those don’t do anything, then I would consult XP-Pen’s customer service directly and see if it’s defective and open for warranty.
-Nikage
LikeLike
Hi
How are images extracted from the tablet to other platforms
I don’t know if its possible I’m just exploring the possibilities of the tab before I finally make up my mind
LikeLike
Hello,
The XP-Pen Artist 12 is a “drawing monitor”. For drawing monitors to work, they must be connected to a separate computer as they do not have a computer built into themselves. This means that anything you draw on a drawing monitor is saved on the computer, not on the tablet itself.
You may wish to familiarize yourself with the concept of connecting multiple monitors to your computer to understand how a drawing monitor works.
For standalone tablets which do have a computer built into them (such as iPad or Android tablets), you will usually have the option to connect them to a separate computer to transfer the files from the tablet to the computer.
Hope that answers your question,
Nikage
LikeLike
I just bought a Intuos Pro M but found out about this little tablet soon after. It’s my first foray into digital painting so I’m not sure which is better. I like the screen but is it worth it?
LikeLike
Hey there,
Whether you go with the Wacom Intuos Pro M, or XP-Pen Artist 12, either choice is really good!
The biggest difference between a screen-less tablet and drawing monitor is where you are looking while drawing; up towards the screen in front of you, or down towards your hand.
It takes a bit more time getting used to drawing on a screen-less tablet than a drawing monitor because you have to learn how to draw without looking at the pen, and many people get frustrated during this learning phase, but once you get the hang of it you can draw the exact same quality of art on both types of tablets.
I personally prefer drawing on screen-less tablets myself as it hurts my neck less over long drawing sessions since I’m looking up instead of down, but aside from that, both types of tablets are capable of the exact same things. Basically, it all comes down to preference.
If you want a screen on your tablet, then the XP-Pen Artist 12 is a good choice, but having a screen on the tablet is not necessary for creating good art. Drawing good art all comes down to how much you actually draw and practice!
*Do keep in mind though that you will need to pay extra for a tablet stand to use with the XP-Pen Artist 12 because it doesn’t come with one.
Hope that made sense,
Nikage
LikeLike
Hi, I’ve always wondered, since this tablet uses a USB-C port, is it possible to power this whole thing using a third-party USB-C to USB-C cable? That would make it a true one-cable experience and make it the best on-the-go art machine, in my opinion. Hope you take the time to reply, thanks.
LikeLike
Hi there,
You bring up a good question!
I couldn’t really figure out much about using a single USB type-C cable for a drawing monitor, but I’ve noticed that Wacom uses a USB type-C connection on their Cintiq Pro 13 and even they don’t support the use of a single USB type-C cable to power and connect the tablet. This is despite them being the leading company in terms of tablet technologies!
So with that in mind, I’m assuming there’s some sort of limitation at present on USB type-C technologies, whether it’s in the USB type-C hardware, or the underlying USB type-C software.
For instance, maybe USB type-C can only support display or USB, but not both at the same time? This doesn’t seem to be a hardware issue because USB type-C can clearly do both of those things separately, just not at the same time. So perhaps there’s simply no programming in Windows/MacOS which supports sending USB, display, and power all through the same USB type-C port.
It could just be that USB type-C is programmed to “ask” the connected device whether it’s a display or USB device, and isn’t programmed to ask if it’s both.
If you think about it, what other situations are there where you would need to send both a display signal and USB signal through the same USB type-C port? I’m not sure about you, but I can’t seem to think of any aside from drawing monitors. This means that this use case is a fairly niche use case of USB type-C, so the people who programmed USB type-C for Windows/MacOS wouldn’t feel the need to go that extra mile to program USB type-C to send both USB and display signals at the same time.
Anyways, that’s just my speculation. You probably shouldn’t take my words to heart because the actual answer is most likely something else.
All I know for sure is that Wacom hasn’t been able to do it yet, and I doubt other companies will do it before them.
-Nikage
LikeLike
Hi there,
Thank you so much for the reply, I love your enthusiasm in addressing questions from us, the readers. I’d like to chime in further regarding this.
Mentioning Wacom, I’m not quite sure that is correct, though. I haven’t spent as much time researching Wacom’s products as Huion/Xp-Pen’s, but I remember quite distinctly in MobileTechReview’s video on the Cintiq Pro, Lisa said something close to “you can use Wacom’s one-cable USB-C solution” on their Cintiqs. I inferred that that means Wacom has a USB-C to USB-C capability, and that it is not out of the question.
And regarding USB-C’s data and power capability, I still think it’s quite possible. Higher-end monitors from LG, Dell, and such uses USB-C connectors instead of HDMI, which means the cable needs to transfer display signal for video output, transfer data for the monitor’s extra USB port, and transfer power to charge the device (assuming it’s connected to a laptop), all at the same time. That kinda meets our requirements to power a display tablet, don’t you think?
Then again, I’m no expert and it could be that they’re using Thunderbolt 3 technology and not the standard USB-C, which is a whole other can of worms. I don’t know for sure. I’m just throwing out conjecture here, trynna expand the discussion cuz it’s fun to theorize and hope 😁.
LikeLike
Hey there,
You bring up a really great point about higher-end monitors which are able to use USB type-C connectors to send data and display signals at once.
There are also lots of cases where users are able to connect their Cintiq Pro 13/16 with a single USB type-C cable for data and display, just not power. I am really lacking with regards to my understanding of USB type-C (I have literally no computers with it), so I’m sorry for the previous uneducated guess which was clearly wrong.
Anyways, from what I have seen for the specs of Thunderbolt 3, it says it can supply up to 100W of power (on this page: https://thunderbolttechnology.net/blog/thunderbolt-3-usb-c-does-it-all), meaning it can supply well over the 45W which the Cintiq Pro 13 and 16 appears to need (Cintiq Pro 13/16 power adapter is 45W: https://us-store.wacom.com/Catalog/Accessories/cintiq-pro-13-16-power-adaptor#/undefined1).
So assuming a Thunderbolt 3 port can supply a 3 signals at once, the Cintiq Pro 13/16 should be able to be powered and connected with a single Thunderbolt 3 cable.
However, from what I’ve seen, it appears the Cintiq Pro 13/16 is not made to be able to do that.
I can’t seem to Google any successful cases where a user connects the Cintiq Pro 13/16 to a single Thunderbolt 3 port and gets all 3 signals. There are a lot of successful cases of users getting data and display through their USB type-C ports (not limited to Thunderbolt 3), but every user with Thunderbolt 3 appears to need to use the Wacom power adapter to get their Cintiq Pro 13/16 to work.
In a Thunderbolt 3 pdf document (this one: https://thunderbolttechnology.net/sites/default/files/Thunderbolt3_TechBrief_FINAL.pdf), it says:
“In this way, it is possible for the Thunderbolt 3 enabled USB-C connector to support charging, display, data, or all of them at the same time in various configurations.”
So clearly, Thunderbolt 3 should be able to send all 3 signals at once.
In the same document, a paragraph above where it says the quote above, it also says:
“(if designed to support this by the system manufacturer)”
In other words, either the Wacom Cintiq Pro 13/16 or the computer with Thunderbolt 3 does not have support for all 3 signals at once.
It’s hard to say which is the cause of the problem when there is a lack of people posting their results trying this with their devices. I guess that’s because only a small number of people have Thunderbolt 3 enabled computers, and an even smaller portion of those people are artists with a Cintiq Pro 13/16.
If the problem is the Cintiq Pro 13/16, perhaps it’s programmed to only ask the computer for either data+display or power, and not all 3 at once?
With regards to the XP-Pen Artist 12 with a single USB type-C connection, I honestly doubt XP-Pen would have gone through the hassle of designing their device to support that method of connection. I’m sure they would be advertising it all over their product page as a special feature if they’d spent the time to design/program it.
It’s funny how USB type-C was supposed to make things easier, and all it’s done so far is make everything far more complicated than before. xD
-Nikage
LikeLike
Well, The XP Pen 22R that were recently announced were the first Drawing monitor that supports USB-C to USB-C connection, meang that there’s no need for HDMI and USB combined cables (even though it still need to be powered from power outlet). Still, I’m worried about the quality of the built in stand, since there’s no VESA holes there *CMIIW (I always prefer VESA holes, because it would be easier to be put into my custom monitor arm in my custom table, if I could actually afford those items in the future 😅🤦🏻♂️)
Anyway , the monitor itself has 20 shortcut+ wheel, making it the second drawing monitor with largest amount of shortcut available (While the Kamvas 16 is the second with 14 Shortcuts, any idea why Kamvas pro didn’t had that much Shorcut ? I’m confused )..
(Fyuuh, it doesn’t get snowballed too much like the last one. For artist, it’s hard to know What to say, and it’s even harder knowing what Not To Say ) .
LikeLike
Hey again,
It’s interesting how XP-Pen has been able to support USB-C to USB-C connection despite Wacom not doing it (at least as far as I know).
I didn’t look far enough into the XP-Pen Artist 22R Pro to hear about the lack of VESA mount holes, although from looking at the product specifications on XP-Pen’s site, it says that it’s VESA compatible for 100x100mm?
I feel like I heard that the Huion Kamvas Pro 20 (2019) or 22 (2019) finally had separated left/right shortcut buttons, but I’m not too sure where I heard that. Maybe it’s just me dreaming about how they should’ve been.
-Nikage
LikeLike
Hello- I recently purchased the tablet but the cord to the tablet actually broke- instead of the port itself! it’s currently bent to the point where it doesn’t respond when plugged in, and i was curious if there were any cheaper alternatives to the 3 in 1 cord- since I don’t need to use the extra plug-in-to-the-wall support.
LikeLike
Hey there,
I’m sorry to hear that!
If it broke through normal use and wasn’t broken by user error, then you should be able to get it replaced under the warranty.
Try contacting XP-Pen support if the cable just broke on its own from normal drawing usage.
On the other hand, if the cable was broken by your error (accidental or otherwise), then unfortunately, I have not heard of a way to connect the tablet using any cable aside from the designated 3-in-1 cable. Sorry!
-Nikage
LikeLike
Hello.
I’m turning crazy to choose between XP-Pen Artist 12 and Huion Kamvas Pro 13 HD.
I’m working on graphic design and Illustration but I had worked always with traditional tablets, and I want to try a not expensive “Screen Graphic Tablet”. Both seem correct, and both with similar characteristics. Huion is more expensive but maybe it worths.
If you please can give me some advice to choose I will appreciate.
Thank you.
LikeLike
Hey there,
Like you said, both are very good devices, however, I personally think that the Huion Kamvas Pro 13 is overall “better” when considering a few factors.
The reasons why I consider the Huion Kamvas Pro 13 to be better than the XP-Pen Artist 12 is because it has a better colour gamut, and because it has a laminated screen which results in less distance between the pen tip and the screen which usually makes it easier to calculate where the cursor will appear relative to the pen.
The reason why I think a higher colour gamut is important is because you cannot upgrade the screen on your tablet. You are stuck with the screen you get. So if you get a tablet with a lower colour gamut and you notice that it is not showing certain colours very well (because of the limited gamut), you will need to spend more money to buy a whole new tablet in the future for better colours (or refer to a separate monitor for correct colours, which is not ideal since you want to be able to do everything directly on the tablet).
The Huion Kamvas Pro 13 also comes with a tablet stand included, whereas you need to buy a separate stand for the XP-Pen Artist 12, and this somewhat explains the higher price.
However, with that said, there are a few reasons why you may want to go with the XP-Pen Artist 12.
-One reason is because you just want to try a cheap drawing monitor to see what it’s like to draw on a screen. If that’s the case, the XP-Pen Artist 12 is probably the best, cheapest 1080p resolution option there is at the moment.
-Another reason is if you want a drawing monitor to take around with you. Of course, the Huion Kamvas Pro 13 is quite portable as well because it’s small, but it needs to be connected to a wall outlet for power and can’t just be powered from your computer’s USB ports, whereas the XP-Pen Artist 12 can be powered solely off the USB ports. This makes the XP-Pen Artist 12 slightly more portable because you just need your laptop to power it, and you don’t need to find places with power outlets.
In conclusion, I think both choices are good, but I would recommend the Huion Kamvas Pro 13 if you’re willing to pay the higher price. But if you just want to see what it’s like drawing on a drawing monitor, I would recommend the XP-Pen Artist 12 since it’s quite a bit cheaper.
As a side note, after trying both screen-less tablets and drawing monitors, I’ve found that I personally prefer screen-less tablets. The two tablet types are not particularly different once you’re used to them, so if using a screen-less tablet is not getting in the way of your drawing, perhaps you would like to consider continuing to use your current screen-less tablet?
Oh, but it is your money so you can decide whether you want to spend and try a drawing monitor or not. I just wanted to say that I don’t see much of an advantage to drawing directly on the screen if you’re already used to drawing on a screen-less tablet.
Hope that helps,
Nikage
LikeLike
Yes Nickage, thanks it helps so much.
I will consider all your points, even a new screen-less tablet. Some favorite?
Many thanks.
LikeLike
My personal favourite screen-less tablet is undoubtedly the Huion H1060P.
Other notable screen-less tablets that you could also check out though are the XP-Pen Deco 03, Huion New 1060 Plus, and XP-Pen Deco 01.
-Nikage
LikeLike
This question is very important for me considering getting this does the pen to screen feel like pen to ice/glass or pen to paper or somewhere in between
LikeLike
Hey there,
It is somewhere inbetween. The pre-applied screen protector gives a slight bit more texture than smooth glass, but it is not as rough as pen to paper.
-Nikage
LikeLike
Hi, I got this this week and having some issues with the power cord and the display. It says no signal, and the power l shape cord isn’t sitting flush to the machine. It doesn’t feel like it’s clicking in right, but the USB part is working.
Is this common?
LikeLike
I do not know if that is common, but my unit does not have those problems.
You will probably want to contact XP-Pen directly (once they’re back from their Feb 1-10 break) to see if your unit is defective.
LikeLike
hello,I’d like to know if this tablet responds to finger touch
LikeLike
Hey there, thanks for asking.
No, this tablet does not have finger touch input. It only works with the included pen.
-Nikage
LikeLike
hey!
Thanks for the review.
Please tell me if XP-PEN Artist 12″ Pro is working without PC / laptop connection.
LikeLike
Hi there,
The XP-Pen Artist 12 Pro is not a standalone device. It must be connected to a computer to work as it is just a second monitor with pen input functionality
-Nikage
LikeLike
thank you for your answer! Prompt and useful
– Alex
LikeLike
Hello, is this tablet compatible with GIMP?
LikeLike
Hey there,
I believe it should be, but I don’t use GIMP so I do not know to what extent.
I recommend asking XP-Pen directly so that you have their word on compatibility if you order it. (If you have their word that it works with GIMP, you should be able to refund it in the case it doesn’t work with GIMP.)
-Nikage
LikeLike
Hi I just received this for Christmas and was wondering do you only need to computer for installment or do you need to have it with you anytime you use the artist 12
LikeLike
Hi there,
The XP-Pen Artist 12 needs to be connected to a computer to be used and will not work by itself.
LikeLike
Hello! I have a question, I’m wondering if this works with an HP Chromebook?
LikeLike
Hi there,
Sorry, but I do not think these tablets work on Chromebooks.
However, I am not completely sure so I recommend contacting XP-Pen directly to confirm this. I believe the email given in the Pre-sale section on their contact page is the appropriate for this question: https://www.xp-pen.com/page/Contact
-Nikage
LikeLike